Apple will officially remove support for legacy MDM-based software update management in all 27 operating systems.
Announced last year, legacy software update management no longer functions in all 27.0 operating systems.
Software update commands, queries, recommended cadence settings, and update restrictions such as deferrals and Background Security Improvements will no longer function using the MDM protocol.
Going forward, your MDM solution must use Declarative Device Management (DDM) to manage and enforce operating system updates. Now it is time to check with your MDM vendor and confirm they have implemented this. BlackBerry UEM has DDM implemented and automatically switches capable devices over from MDM. There is no manual action required from the administrator to make the switch.
(tl;dr vowe: Abdelkader erklärt, wie man zentral Apps verteilen kann, die keinen Zugriff auf Geschäftsdaten haben. Typisches Beispiel: Social Media Apps für Social Media Teams im Marketing.)
Apple ermöglicht in Verbindung mit einer MDM-Lösung die Verteilung von Apps auf iPhone und iPad. Die App-Verteilung gehört zu den Kernfunktionen eines Mobile Device Managements: Geschäftlich erforderliche Anwendungen werden zentral bereitgestellt und können automatisch installiert werden.
Apps, die über das MDM automatisch installiert werden, erhalten den Status managed und können auf dienstliche Daten zugreifen. Diese Daten werden als managed Data klassifiziert. Die Trennung zwischen privaten (unmanaged) und geschäftlichen (managed) Bereichen ist dabei ein zentrales Sicherheitsmerkmal von iOS und iPadOS. Über MDM-Richtlinien lässt sich sicherstellen, dass managed- und unmanaged-Daten strikt getrennt bleiben. Beispielsweise kann verhindert werden, dass ein Dokument aus einem geschäftlichen E-Mail-Konto in eine private Messaging-App exportiert wird. Auch die Nutzung der Zwischenablage zwischen verwalteten und unverwalteten Apps kann unterbunden werden.
Es existieren Szenarien, in denen Organisationen Apps auf iPhone oder iPad bereitstellen möchten, ohne diesen Anwendungen Zugriff auf geschäftliche Daten zu gewähren. Ein typisches Beispiel ist ein Social-Media-Team, das verschiedene Apps benötigt. Diese Apps sollen für die tägliche Arbeit verfügbar sein, jedoch keinen Zugriff auf dienstlichen Daten erhalten. Zur Umsetzung dieses Szenarios muss die MDM-Lösung „Managed Distribution for Users“ unterstützen. In BlackBerry UEM ist diese Funktion implementiert.
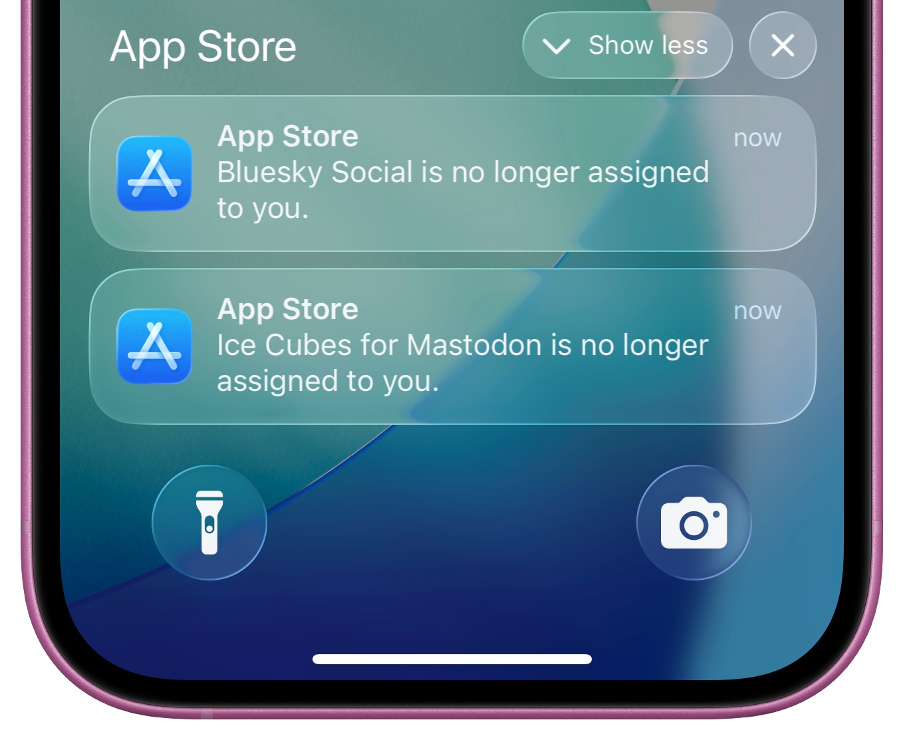
Im Folgenden werden die technischen Voraussetzungen und Konfigurationsschritte beschrieben. Damit die Verteilung unverwalteter Apps über den BlackBerry UEM funktioniert, muss der BlackBerry UEM in der Version 12.23 QF2 (On-Premise oder Cloud) installiert sein und an den Apple Business Manager angebunden sein. Im BlackBerry UEM muss auch ein gültiges VPP-Token eingerichtet sein. Über das Apple Volume Purchasing Program werden die zu verteilenden Apps beschafft. In meinem Beispiel verwende ich ein per Apple Device Enrolment am UEM aktiviertes iPhone mit iOS 26.3. Mit einer reinen MDM-Aktivierung würde es auch funktionieren. Da die Apple für die unverwaltete App Installation einen Apple Account erfordert, benötigen wir einen Persönlichen oder Managed Apple Account. Seit September 2025 erlaubt Apple im Apple Business Manager verwaltete Endgeräte auf die Nutzung mit Managed Apple Accounts einzuschränken. Entspricht die E-Mail-Adresse des BlackBerry-UEM-Benutzers dem Managed Apple Account, führt BlackBerry UEM das VPP-Enrolment automatisch durch. Bei einem persönlichen Apple Account oder wenn sich die Benutzernamen unterscheiden, muss das Enrolment manuell abgeschlossen werden. Der Benutzer bekommt hierfür im Enterprise App Store (Work Apps) einen Hinweis. Diese Setup ermöglicht die benutzerbasierte App-Zuweisung und gleichzeitig wird der Zugriff auf die managed Data verhindert. In diesem Beispiel werden die Apps Ice Cubes for Mastodon und Bluesky als unverwaltete Anwendungen bereitgestellt. Beide Apps wurden im Apple Business Manager in ausreichender Lizenzanzahl für den Standort des BlackBerry UEM-Servers beschafft.
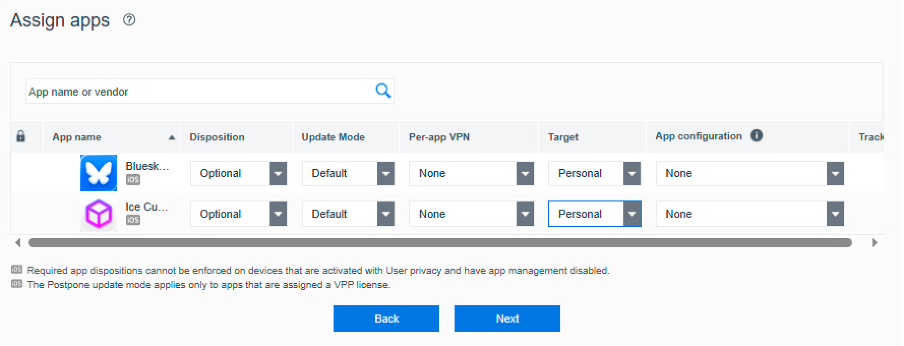
Zur strukturierten Zuweisung wird eine Benutzergruppe mit der Bezeichnung „Social Media Apps“ erstellt, der anschließend beide Anwendungen zugewiesen werden. Für jede App ist die Disposition auf „Optional“ zu setzen und das Target auf „Personal“ zu konfigurieren. Nur mit diesen Einstellungen ist gewährleistet, dass die Anwendungen nach der Installation durch den Benutzer unverwaltet bleiben. Da es sich um unverwaltete Apps handelt, können weder App-Configuration-Profile noch Per-App-VPN-Profile zugewiesen werden.
Screenshot BlackBerry UEM-Konsole – Disposition Optional & Target Personal
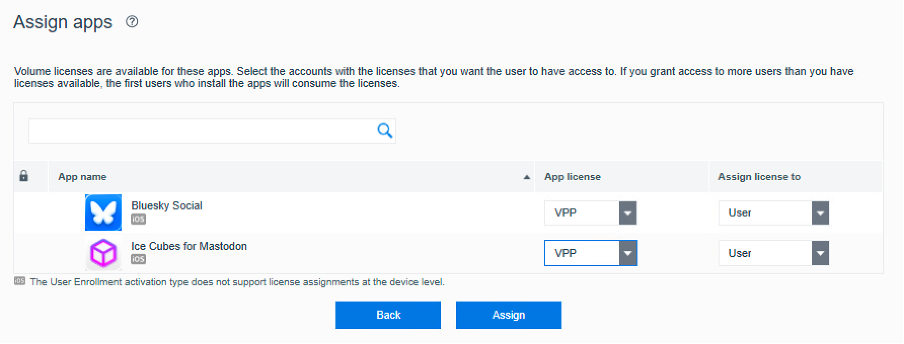
Die Lizenzierung erfolgt jeweils über eine VPP-Benutzerlizenz. Nach Erstellung der Gruppe werden die entsprechenden Benutzer hinzugefügt.
Screenshot BlackBerry UEM-Konsole – Apps mit VPP-Benutzerlizenz
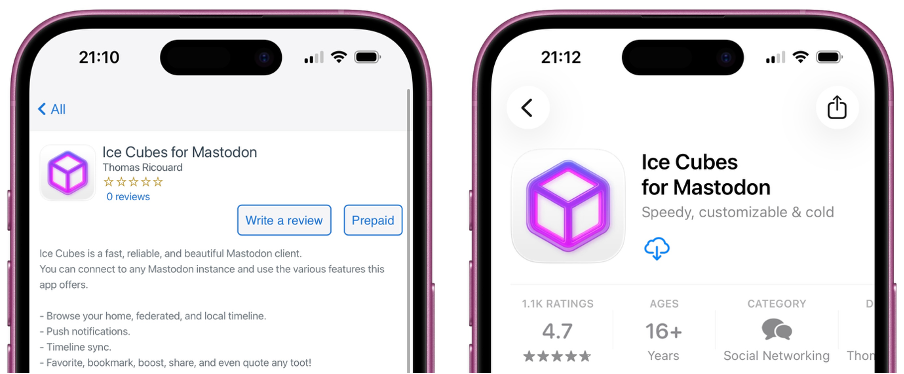
Auf dem iPhone meldet sich der Benutzer im App Store mit seinem Apple Account an. In diesem Szenario wird ein Managed Apple Account verwendet. Managed Apple Accounts können selbst keine Apps beschaffen, weshalb der Einsatz von Managed Distribution for Users der einfachste Weg ist diesen Accounts App-Lizenzen zuzuweisen. Anschließend öffnet der Benutzer auf dem durch BlackBerry UEM verwalteten iPhone den Enterprise App Store mit der Bezeichnung Work Apps. Dort erscheinen die zugewiesenen Anwendungen im Reiter New. Über den Button Prepaid erfolgt die Weiterleitung in den Apple App Store, von dem aus die Installation gestartet werden kann. Sollte der Download-Button noch deaktiviert sein, empfiehlt es sich, den Vorgang nach einigen Minuten zu wiederholen, da die VPP-Infrastruktur von Apple in Einzelfällen etwas Zeit benötigt, um Lizenzen den jeweiligen Apple Accounts zuzuweisen.
Screenshot iPhone – Work Apps und Apple App Store mit Ice Cubes for Mastodon App
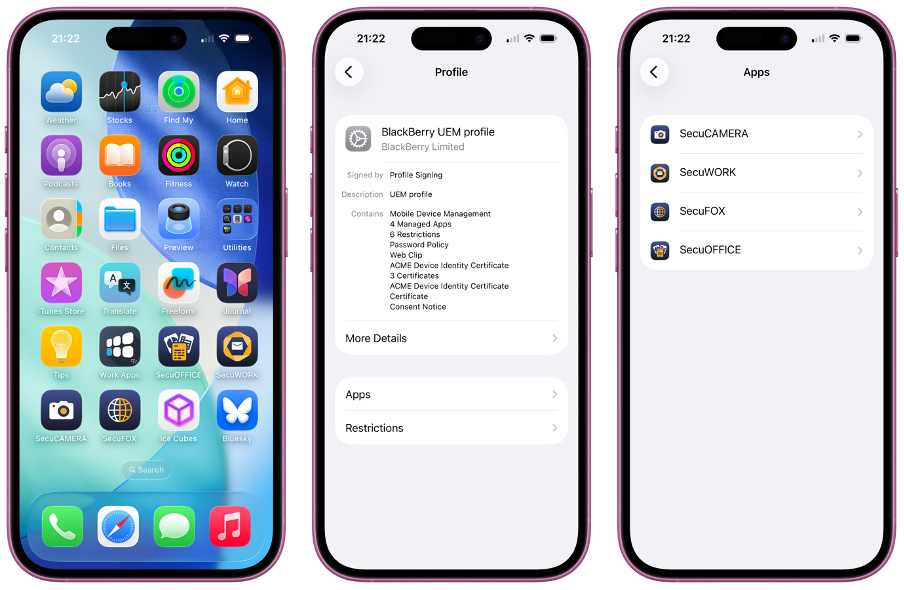
Nach erfolgreicher Installation lässt sich im MDM-Profil unter „Apps“ verifizieren, dass die über Managed Distribution for Users bereitgestellten Apps dort nicht aufgeführt sind. Sie gelten somit als unverwaltet und besitzen keinen Zugriff auf geschäftliche Daten. In diesem Beispiel sind nur die vier Secu-Apps verwaltet.
Screenshot iPhone MDM-Profil – verwaltete und unverwaltete Apps
Managed Distribution for Users ermöglicht den Entzug zugewiesener App-Lizenzen. Da die Anwendungen unverwaltet sind, werden sie nach dem Lizenzentzug nicht vom Endgerät entfernt. Nach Entzug der Lizenz kann der Benutzer die App noch bis zu 30 Tage weiterverwenden. Diese Funktion ist insbesondere bei kostenpflichtigen Apps relevant, da Lizenzen dadurch einem anderen Benutzer zugewiesen werden können, ohne erneut eine Lizenz erwerben zu müssen. Über den Lizenzentzug wird der Benutzer im App Store entsprechend informiert.
Screenshot iPhone App Store – Lizenzen für Bluesky und Ice Cubes wurden entzogen
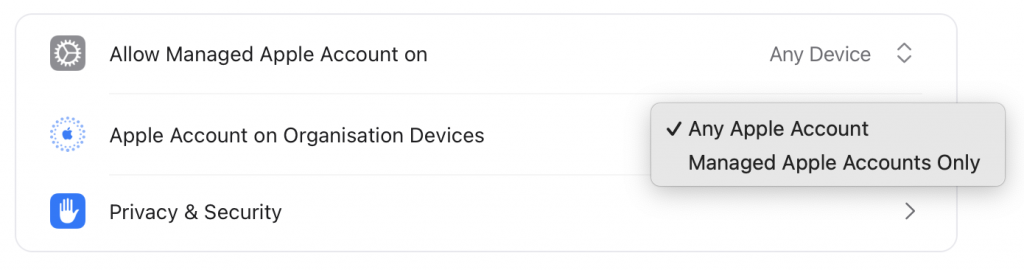
Apple has introduced a new feature in Apple Business Manager (ABM) that allows administrators to control which Apple Accounts can sign in on managed devices. Apple calls this feature Apple Account on Organisation Devices. This setting is in your ABM tenant under Access Management-> Apple Services. Administrators can choose to allow either any Apple Account or restrict sign-in only to Managed Apple Accounts. This capability enables organizations to block users from utilizing Personal Apple Accounts on company-issued devices. Previously it was only possible to restrict on which device type Managed Apple Accounts can sign-in.
macOS ermöglicht es dir, Content Caching Server einzurichten, die Apps, Bücher und Updates im lokalen Netzwerk speichern. Das ist ideal für Umgebungen mit vielen Apple-Geräten, wie Unternehmen oder Schulen, da es den Internet-Datenverkehr erheblich reduziert. Die Updates werden durch die Endgeräte vom Content Caching Server geladen, statt über Apples CDN-Infrastruktur.
Auf deinem iOS-26-Gerät kannst du die Funktion jetzt direkt überprüfen: Gehe zu Einstellungen-> Wi-Fi, tippe auf das (i) neben deinem Wi-Fi-Netzwerk und scrolle zum Abschnitt „Content Caches“. Dort siehst du alle Details und kannst mit einem Test die Download-Geschwindigkeit messen. Bei iPhones oder iPads die nur per Ethernet angebunden sind, werden die Details zum Content Caching nicht angezeigt.
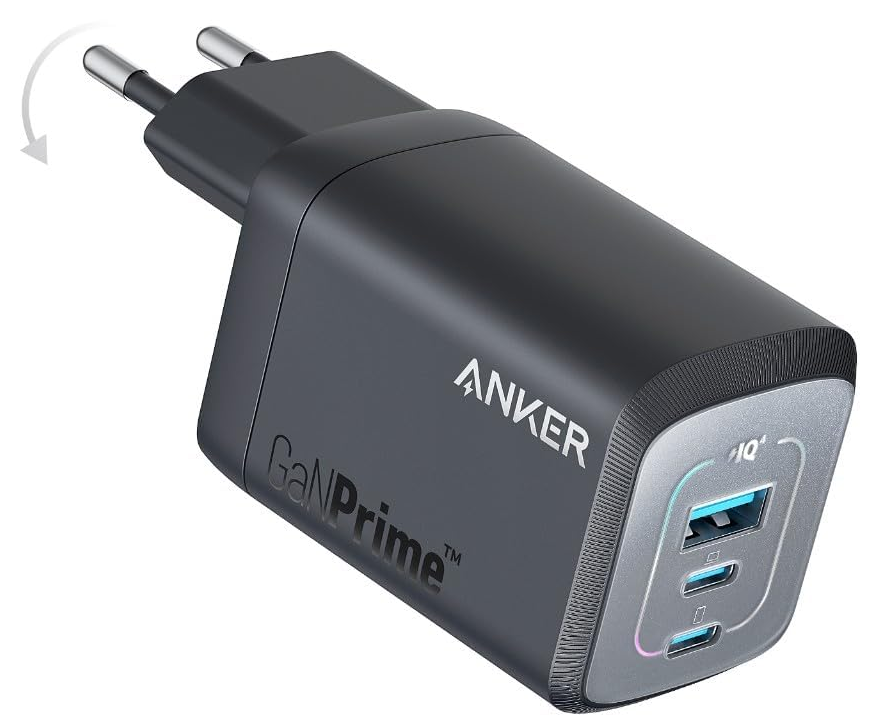
Mein UGREEN 100W GaN-Netzteil wurde in meinem Reisesetup durch ein neues 100W-Modell von Anker ausgetauscht. Was das neue Netzteil so gut macht? Es unterbricht nicht die Ladung bereits angeschlossener Geräte, wenn man ein weiteres hinzusteckt. Das ist ein riesiger Vorteil – zum Beispiel, wenn man einen Travel-Router damit betreibt. Das Netzteil reduziert beim Anschluss weiterer Geräte nur den Strom und behält die Spannung an den schon belegten Ports bei.
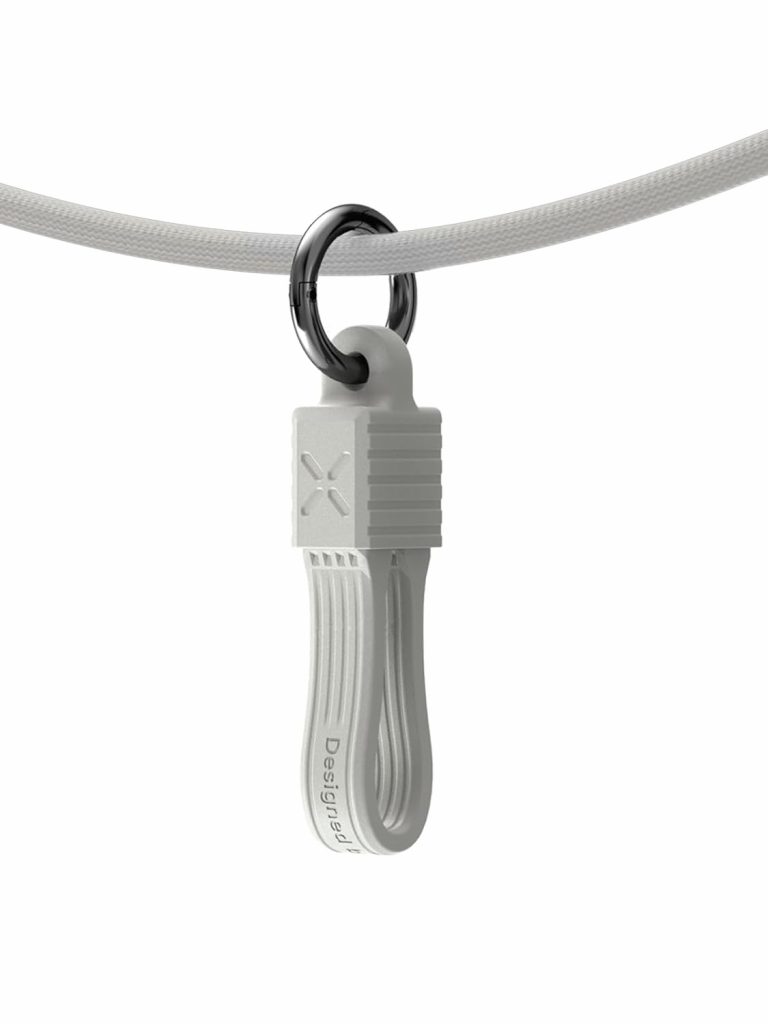
Das Apple-Ladekabel taugt nicht viel. Zu empfindlich, zu langsam für schnelle Datenübertragung, zu dünn für große Ladeströme. Deshalb habe ich an meinem Rucksack ein ganz kurzes Kabel, das 240 W und 40 Gigabit pro Sekunde übertragen kann.
Das APNS-Zertifikat ist das wichtigste Zertifikat. Ohne das APNS-Zertifikat kann der MDM-Server keine Push Nachrichten an die Endgeräte, z.B. einem iPhone oder iPad, schicken. Sehr vereinfacht ausgedrückt, funktioniert das mit dem APNS für die MDM-Kommunkiation so: Die Push Nachricht weckt den sogenannten MDM-Daemon am Endgerät auf. Der MDM-Daemon verbindet sich dann mit dem MDM-Server und ruft alle dort anstehenden Befehle ab. Sind keine Befehle mehr da, dann legt sich der MDM-Daemon wieder schlafen. Um das APNS-Zertifikat zu erstellen, generiert man in seinem MDM-Server eine Zertifikatsanforderung. Diese Zertifikatsanforderung lädt man bei Apple unter https://identity.apple.com/pushcert. Dort muss man sich mit einem Apple Account anmelden um von Apple das Zertifikat erstellen zu lassen. Das Zertifikat muss dann in den MDM-Server hochgeladen werden. Sobald das erledigt ist, können am MDM-Server Apple-Endgeräte aktiviert und verwaltet werden.
Wichtig: Man muss das APNS-Zertifikat immer unter demselben Apple Account erstellen und erneuern. Nutzt man einen anderen Apple Account, dann verliert man damit die MDM-Kommunikation zu seinen Endgeräten.
Falls man den Apple Account, aus welchen Gründen auch immer, ändern möchte, dann muss man sich an den Apple Support wenden. Die können einem helfen das APNS-Zertifikat auf einen anderen Apple Account zu übertragen. Daher mein weiterer Tipp: nutzt für die APNS-Zertifikate einen generischen Apple Account, für den ihr im dienstlichen Passwortmanager die Zugangsdaten speichert.
Für die Verteilung von Apps und Büchern ist das VPP-Token relevant. Das VPP-Token wird im Apple Business Manager erstellt. Das VPP-Token ist eine Base64-codierte JSON-Datei. Das Token muss in den MDM-Server kopiert bzw. importiert werden. So kann man Apps und Bücher, die man voher im Apple Business Manager beschafft hat, an seine Nutzer verteilen. Wobei das Beschaffen sich nicht nur auf kostenpflichte Apps und Bücher bezieht, sondern man das auch für kostenfreie Apps und Bücher nutzen. Das ist dann z.B. relevant wenn man iPhones und iPads ausgibt, auf denen die Nutzer keinen Apple Account haben. Das VPP-Token erlaubt es Apps an ein Gerät zu lizenzieren und die Installation zu erlauben. Damit entfällt die Notwendigkeit eines Apple Accounts. Hat man mehrere MDM-Server im Einsatz, ist meine Empfehlung im Apple Business Manager (ABM) pro MDM-Server einen Standort zu erstellen. Pro Standort kann man im ABM ein VPP-Token herunterladen. So bleibt im Überblick auf welchem MDM-Server welche Apps in Verwendung sind.
Wichtig: Wird das Passwort für den Apple Account, mit dem das VPP-Token erstellt wurde, geändert, dann verliert das VPP-Token seine Gültigkeit.
Es reicht das VPP-Token im ABM erneut herunterzuladen und im MDM-Server zu aktualisieren. Dann können wieder Apps und Bücher verteilt werden.
Für die Geräteaktivierung, von Apple Automated Device Enrollment genannt, gibt es noch das sogenannte ADE-Token. Das ADE-Token ermöglicht eine Zero Touch Aktivierung der Apple-Endgeräte. Auch das ADE-Token wird im ABM erstellt. Um das ADE-Token zu bekommen, muss man zuvor im MDM-Server ein Schlüsselpaar generieren. Im MDM-Server lädt man den öffentlichen Schlüssel herunter. Diesen lädt man im ABM-Portal hoch und kann im Anschluss den Token herunterladen. Das Token muss im MDM-Server importiert werden. Im Anschluss muss im MDM-Server nur noch die Enrollment Configuration eingerichtet werden. Die Enrollment Configuration definiert unter anderem welche Bildschirme und Einstellungen bei der Aktivierung und Einrichtung des Endgerätes angezeigt werden. Damit Geräte über ADE aktiviert werden können, müssen sie dem MDM-Server zugewiesen werden. In die eigene ABM-Instanz werden neu gekaufte Geräte normalerweise vom Händler gepackt. Der braucht von euch nur eure Organisations-ID aus dem ABM. Hier habe ich beschrieben, wie man mit dem Apple Configurator Geräte manuell in den ABM aufnehmen kann.
Wichtig: Hat man das ADE-Token im MDM-Server schon eingebunden und lädt es im ABM nochmal herunter, dann verliert das schon im MDM-Server importierte ADE-Token seine Gültigkeit.
Das neue ADE-Token muss importiert werden, dann können wieder Endgeräte gegen diesen MDM-Server aktiviert werden. Falls ihr im ABM die automatische Gerätezuordnung zu einem MDM-Server konfiguriert habt und neue Geräte am MDM-Server nicht auftauchen, dann meldet euch im Apple Business Manager an. Eventuell hat Apple neue Terms and Conditions für den ABM veröffentlicht, die noch nicht akzeptiert wurden. Erst wenn die akzeptiert wurden, klappt es mit der automatischen Gerätezuweisung wieder.
Die oben genannten Zertifikate bzw. Token sind alle maximal ein Jahr gültig und müssen rechtzeitg erneuert werden. Wenn ihr die zeitige Erneuerung mal verpassen sollte, dann könnt ihr das auch ein paar Tage später nachholen. Ich habe die Beschreibung so generisch wie möglich gehalten, weil sich die Verwaltung der Tokens und Zertifikate je nach Hersteller der MDM-Lösung leicht unterscheiden kann. Grundsätzlich sind alle MDM-Hersteller auf die Anbindung der Tokens und Zertifikate angewiesen, damit eine reibungslose Integration in die Apple-Welt möglich ist.
Today, Apple has unlocked a new feature in Apple Business Manager which will allow customers to migrate ADE devices from one MDM to another without the need to wipe the devices. This will significantly simplify the process of changing an existing MDM solution. The feature will require the devices to be on iOS or iPadOS 26. You can set an enrolment deadline. If the user has not migrated the device by the deadline, the migration will be enforced on the due date. Devices running macOS 26 can also be migrated using this new feature.
In your Apple Business Manager tenant you can filter for devices that support the enrolment deadline. This gives you a simple way to narrow down the devices in your ABM tenant that support the migration feature.
I have several customers who are planning to migrate from a third-party MDM to BlackBerry UEM. The release of iOS and iPadOS 26 will make the migration a lot easier. I cannot wait to test this migration approach in my lab and use it in production with my customers.
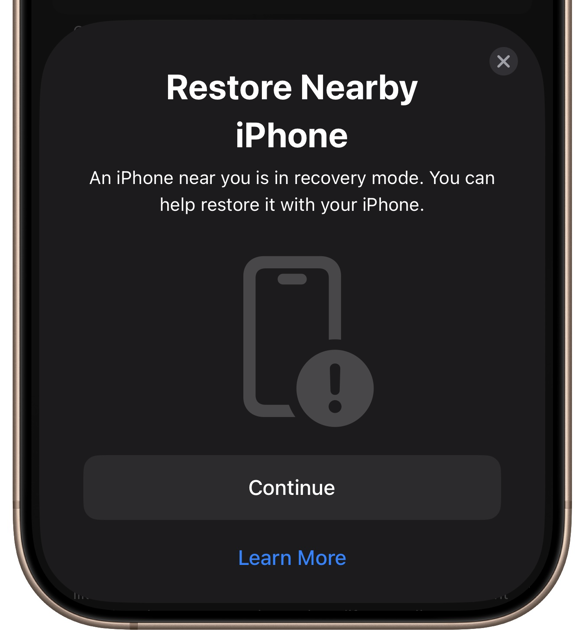
Previously I explained how you could use an iPhone to add another iPhone or iPad to Apple Business Manager. There is another common task where you no longer need a Mac or PC: restoring iOS on an iPhone in recovery mode.
The process is very simple and only requires an iPhone or iPad running iOS 18.
You will see a screen titled support.apple.com/iphone/restore showing a computer and USB cable.
While in this state, click the side button as fast as possible until the Apple logo appears and starts flashing. Release the button.
You will see an animation of two iPhones moving closer to each other. Your iPhone is now in the wireless restore mode.
On your other iPhone you will see a pop-up Restore Nearby iPhone
Click Continue.
Enter the six digit pairing code shown on the other iPhone. The pairing process will take a few moments to complete. The process will fail if your iPhone or iPad are connected to a Wi-fi network with a captive portal or where 802.1x authentication is required.
Select System Recovery and tap Continue.
Depending on your Internet bandwidth, the process can take time to complete. Be patient and make sure to connect both devices to a charger while the process is running.
So far, I have used this feature to restore an iPhone 16 and an iPad Pro 11″ M4. Apple states that this will work with an iPad mini with an A17 Pro CPU, too. I do not know if this works with older devices, e.g., iPhone 15. I am happy to test if someone sends me the older devices. Regardless, this feature can be particularly useful if you need to restore an iPhone and do not have access to a Mac or PC to complete the restore. Think of scenarios where you have users in a remote location, e.g., branch offices, with limited access to a Mac or PC. If you have successfully tested this process with older devices, I would appreciate your feedback in the comments.
Apple hat heute iOS 18.4 veröffentlicht. Mit iOS 18.4 ist es nun ohne Umwege möglich Apple Intelligence in Deutschland zu nutzen. Nach einem Update auf iOS 18.4 wird der Nutzer aufgefordert Apple Intelligence einzurichten. Im Unternehmens- und Behördenumfeld wollt ihr Apple Intelligence gegebenenfalls deaktivieren. Dafür müssen die iPhones und iPads per MDM verwaltet sein. Dann könnt ihr den Geräten sogenannte SkipKeys mitgeben. Mit dem SkipKey Intelligence lässt sich die Aufforderung Apple Intelligence einzurichten ausblenden. Diese Aufforderung erscheint direkt nach dem iOS 18.4 installiert wurde und das iPhone oder iPad gebootet hat.
Im BlackBerry UEM müsst ihr dafür ein Custom Payload Profil erstellen. Dort fügt ihr den unten gezeigten XML-Text ein und weist es den Endgeräten bzw. Nutzern zu. Nach dem Update auf iOS 18.4 wird der Nutzer nicht mehr aufgefordert Apple Intelligence einzurichten.
In der IT Policy, auch bekannt als MDM Restrictions, solltet ihr noch folgende Einstellungen deaktivieren damit der Nutzer diese Apple Intelligence Funktionen nicht nutzen kann:
Allow Genmoji
Allow image playground
Allow image wand
Allow mail summary
Allow personalized handwriting results
Allow writing tools
Allow external intelligence integrations
Allow external intelligence integrations sign-in
Allowed external intelligence workspace IDs
Allow Mail smart replies
Allow Notes transcription
Allow Notes transcription summary
Allow Safari summary
Allow Visual Intelligence summary
Allow Apple Intelligence Report
Damit diese Richtlinien und der SkipKey greifen, müssen die iPhones und iPads supervised sein. Eine reine MDM-Aktivierung reicht nicht aus. Die genannten Einstellungen lassen sich auch in anderen MDM-Lösungen vornehmen. Eine direkte Übernahme des oben gezeigten XML-Beispiels wird in der Regel nicht möglich sein. Bei anderen MDM-Lösungen benötigt ihr eine vollständige .mobileconfig-Datei. Für Details müsst ihr in die Dokumentation eures MDM-Herstellers schauen.
Nutzen eure Anwender BlackBerry Dynamics, dann solltet ihr in der BlackBerry Dynamics Policy noch die Einstellung Allow Apple Intelligence in-app writing tools deaktivieren. Mehr muss man nicht tun um Apple Intelligence auf den verwalteten iPhones und iPads zu deaktivieren.
Und wie immer gilt mein Rat: testet eure Apps und Konfigurationen mit iOS 18.4 bevor ihre das Update für eure Nutzer erlaubt.
This week, Apple has launched the iPhone 16e. There are many commentators with a negative view on the iPhone 16e. Many of them called the iPhone 16e an inferior product and wrong product decision by Apple. I very much disagree with this view. I would like to explain why I disagree.
Who is going to buy the product? A person or an organization which wants to cheapest available iPhone. This will be a customer who does not care for the latest features or fancy colors. They have made the decision based on long term use and a proper support channel. This is especially true for large organizations which are frequently called enterprises. It is especially true for government organizations. These customers buy “fleet devices” by the thousands.
In this type of organisation, users will be issued their iPhone with a screen protector pre-installed, a case, and a USB charger. In some cases Bluetooth might be restricted. If they need a replacement for their accessories, they will call IT or get it from the vending machine. Therefore, there is not much upsell potential for Apple or any third-party accessories manufacturer. Even if these devices came with MagSafe and an UWB chip, it is unlikely that Apple or any other manufacturer would be able to sell any additional accessories to these user groups. So, no upsell on an AirTag or a MagSafe charger.
Enterprises need a device that can last them three to five years. This is a perfect fit for the iPhone 16e. Sure, there are organizations who are deploying iPhone 15 Pro or 16 Pro to their users. These are often VIP users, and the exception.
For the average office worker the iPhone 16e is perfect. The increased battery life is also important for these organisations, as some of them deploy their MDM solution in a darksite scenario where you need to use an Always On VPN or VPN On Demand. These VPN configuration can be very taxing on the battery life. Any increase in battery life is appreciated by these user groups.
Why not a cheaper Android? There are use cases in organisations where Android is the only choice. But often, at least in my experience, iPhones and iPads are much better to manage than most Android devices. The majority of my customers issues iPhones to their users. This is often driven by the fact that the TCO for any iPhone is much better than of most Android devices and the iPhones have a higher acceptance with the users. Even when given the choice between a comparably priced Android smartphone and an iPhone, e.g., iPhone 15 Pro and Samsung Galaxy S24, users tend to select the iPhone.
I am sure there are many enterprises and similar organizations out there which have delayed their smartphone device refresh because they were waiting for “the new iPhone SE”. That is why I think the e in iPhone 16e is for enterprise. If I would have the budget for a new test device, I would have pre-ordered an iPhone 16e.
Aufgeklapptes mophie Reiseladegerät lädt AirPods, iPhone und Watch
Das letzte Jahr war ich deutlich häufiger auf Dienstreisen. Um nicht immer verschiedene Ladegeräte mitzunehmen, habe ich versucht mein Setup zu optimieren. Dadurch habe ich nun ein leichtes Gepäck mit dem ich unterwegs alle meine Geräte gleichzeitig laden kann. Es funktioniert für mein iPhone, mein iPad, mein Laptop, meine AirPods Pro 2 und meine Apple Watch Ultra 2.
Das mophie Reiseladegerät lässt sich sehr kompakt zusammenfalten
Mophie liefert ein 60W USB-C-Kabel mit. Das ist mir kaputt gegangen. Deswegen habe ich es gegen das Anker USB-C auf USB-C Kabel getauscht. Das Set von mophie kommt mit einem 30W USB-C-Netzteil. Das ist zu schwach um auch gleichzeitig mein Laptop bzw. iPad zu laden. Da ich nur ein Ladegerät mitnehmen wollte, habe ich es gegen das UGREEN 100W GaN-Netzteil getauscht. Das Set ist jetzt seit über einem Jahr bei mir im Einsatz und hat sich bewährt. Zur Aufbewahrung und zum Transport benutze ich eine kleine Zubehörtasche von Ikea Namens VÄRLDENS.
Aufgeklapptes mophie-Reiseladegerät mit 100W-Netzteil und 3x USB-Kabel
USB-C auf microUSB-Adapter und microUSB auf Lightning-Adapter
Von dem mophie-Reiseset wurde in der Zwischenzeit eine neue Variante veröffentlicht. Bei Amazon finden sich ähnliche Ladegeräte, z.B. dieses 3-in-1-Ladegerät von Anker. #reklame
Apple allows you to fully automate the MDM enrollment process for most of their devices using Automated Device Enrollment (ADE). In combination with the MDM, ADE allows you to customise and automate the device activation process without the need for an administrator to ever touch the device. To use ADE with your MDM of choice, the devices have to be purchased through an authorized reseller. The reseller can then add the devices to your Apple Business Manager (ABM) instance. There you can then assign them to your MDM servers. For devices that you already own or which were not purchased through a reseller that can add the devices to your ABM instance, there is a manual way to add them. The manual approach requires the use of Apple Configurator – either on an iPhone or Mac. The following steps describe how you can add an iPhone to ABM using another iPhone. It works exaclty the same when you want to add an iPad. I find these steps much easier than using a Mac to add a device to Apple Business Manager.
What you need to prepare and have ready before you begin
The factory reset iPhone or iPad you want to add to ABM
Before you begin, make sure to install Apple Configurator on your iPhone and login with your ABM account. After the login you should be presented with the below view. Notice the view finder in the center of the screen. We will use this view finder later on to scan the enrollment code.
Preparing Apple Configurator
Tap on the cogwheel in the lower left corner
Make sure the “Share Wi-Fi” is selected
Make sure that “None” is selected under “MDM SERVER ASSIGNMENT”
We will assign the device to the correct MDM server instance later
Tap on “Done” in the top left corner
Adding the iPhone to Apple Business Manager
Now get the iPhone or iPad you want to add.
Turn on the iPhone and swipe up on the “Hello” Screen
You will be presented with the language selection screen
Continue the OOBE (out of the box experience) setup until you get to the Quick Start screen. There you will have to tap on Set Up Without Another Device
Continue with the OOBE setup until you get to the Choose a Wi-Fi Network screen
Now get the iPhone where you have previously installed Apple Configurator. When iPhone is in proximity, the screen on the device you want to add, should change to the below view.
Make sure to position the image in the frame of the Apple Configurator to initiate the enrollment process into Apple Business Manager
The enrollment process will beginn immediately
Leave the iPhone with Apple Configurator open, unlocked and next to the device you are adding. If you close Apple Configurator to soon, the enrollment process will fail and you will have to repeate the whole procedure.
When the enrollment process is finished, you will get the below screen showing that the iPhone was added to your ABM instance. Please tap on Erase iPhone to complete the enrollment to your ABM instance
You can now login to your ABM and assign the device to your MDM server instance.
A few months ago, a customer reached out to me and reported that their users running iOS 18 on their iPhones and iPads were seeing an issue where they would not get push notifications for new mails. Unlike with iOS 17, the Mail app would not have fetched emails in the background. Users would have to open the Mail app to update their inbox.
All customer devices affected were running iOS 18 and enrolled to BlackBerry UEM. As the Exchange server is behind the firewall, we used Per-Account VPN to reach the users mailboxes. The VPN tunnel was configured to only allow access to the Exchange server as this was all we need for the mail profile to send and receive messages.
In our test environment we were unable to reproduce the issue. Activating the same device against the customer’s environment immediately showed the issue. As there were multiple variables, MDM, VPN setup, customer’s network, Exchange server configuration, the troubleshooting continued for a few weeks. The actual root cause could not be identified.
About two weeks ago, I was told that Apple’s Private Relay feature might causing the problem. Initially I ruled this out as a cause because none of the customer devices had Private Relay enabled. Apple documents which servers need to be reached for Private Relay to work: mask.icloud.com & mask-h2.icloud.com. I was told that mail delivery for IMAP mailboxes on iOS 18 can be delayed if these two host names cannot be resolved or reached.
Could it be that the Mail app is trying to reach these two hosts while Private Relay is disabled?
Could this be the cause for Exchange ActiveSync Push Notifications not working in my customer’s setup?
To test this theory, I prepared my test environment. To rule out any issues with the MDM setup, I worked with a manually added Exchange mailbox. For the VPN, I opted for a different solution than my customer. I used a device-wide VPN instead of a Per-Account VPN. This allowed me to simplify my testing a bit. I made sure that these two Private Relay hosts are reachable on my network. I sent multiple emails, and all were instantly delivered, and I got notifications for these emails.
I then repeated my testing with the two Private Relay hosts blocked. I would not get any push notifications for new e-mails. When opening the Mail app, it took very long for the messages to be downloaded to the device. It looked like the Mail app had to run into a timeout before it would fetch the emails from the Exchange server.
A second and third round of testing confirmed the results. With the two hosts mask.icloud.com & mask-h2.icloud.com blocked, no push notifications would appear on the device. For all my tests I kept Apple’s Private Relay feature disabled in the iOS settings. I did all my testing on a device with iOS 18.2.1. I did not test if this issue is fixed with iOS 18.3, which was released today.
Today I shared this finding with my customer. After they updated their VPN configuration and made sure that the Per-Account-VPN tunnel can reach the two Apple Private Relay hosts, the issue disappeared and the Mail app worked as expected. Push Notifications were delivered instantly and messages would be downloaded in the background. Finally, we can close this issue.
I know that Per-Account-VPN for Exchange mailboxes is not that common, especially with many organizations already on Exchange Online. Keep in mind that this issue was not caused by the Per-Account-VPN configuration, it only appeared in that specific setup. The VPN tunnel had only a limited set of hosts it was allowed to reach. There is a high chance that you will notice the same issue if mask.icloud.com and mask-h2.icloud.com are not reachable on your network, regardless of if VPN is used or not. It is not an issue occurring only with Microsoft Exchange mailboxes. This issue can also appear when accessing an IMAP mailbox while the device is on a network where the two hosts are blocked.
[Addendum, vowe] If you use Pihole, make sure you whitelist the two mask domains.
This week I have learned a new trick with Keynote on macOS. Using the Live Video feature you can mirror the screen of an iPad or iPhone into your presentation slides.
To use the screen mirroring in Keynote, open an existing presentation or create a new one. From the menu bar select Insert-> Live Video. By default your Facetime camera will be added to the slide deck. To change view to your iPhone or iPad screen, make sure that your device is connected to your Mac using a USB C or Lightning cable. The cable that shipped with your device is sufficient for this to work. On the right side of the Keynote window, click on the plus sign next to Live Video Sources. Give the source a name, e.g., iPhone. Select the connected iPhone or iPad from the drop down list. Click on Add. Your iPhone or iPad screen should now be mirrored to your slide deck as shown below. To make the mirrored device look like the real device, you can overlay the screen mirror with the actual device frame. During your next presentation you can now show the live screen of your iPhone or iPad without the need to leave your presentation. I think this approach can be much more convenient than switching to QuickTime or a third-party app to show your device screen during a presentation.
Bonus tip: You can also use this to mirror your Apple Watch screen. On your iPhone navigate to Settings-> Accessibility-> Apple Watch Mirroring and turn on the mirroring feature.