Apple will officially remove support for legacy MDM-based software update management in all 27 operating systems.
Announced last year, legacy software update management no longer functions in all 27.0 operating systems.
Software update commands, queries, recommended cadence settings, and update restrictions such as deferrals and Background Security Improvements will no longer function using the MDM protocol.
Going forward, your MDM solution must use Declarative Device Management (DDM) to manage and enforce operating system updates. Now it is time to check with your MDM vendor and confirm they have implemented this. BlackBerry UEM has DDM implemented and automatically switches capable devices over from MDM. There is no manual action required from the administrator to make the switch.
(tl;dr vowe: Abdelkader erklärt, wie man zentral Apps verteilen kann, die keinen Zugriff auf Geschäftsdaten haben. Typisches Beispiel: Social Media Apps für Social Media Teams im Marketing.)
Apple ermöglicht in Verbindung mit einer MDM-Lösung die Verteilung von Apps auf iPhone und iPad. Die App-Verteilung gehört zu den Kernfunktionen eines Mobile Device Managements: Geschäftlich erforderliche Anwendungen werden zentral bereitgestellt und können automatisch installiert werden.
Apps, die über das MDM automatisch installiert werden, erhalten den Status managed und können auf dienstliche Daten zugreifen. Diese Daten werden als managed Data klassifiziert. Die Trennung zwischen privaten (unmanaged) und geschäftlichen (managed) Bereichen ist dabei ein zentrales Sicherheitsmerkmal von iOS und iPadOS. Über MDM-Richtlinien lässt sich sicherstellen, dass managed- und unmanaged-Daten strikt getrennt bleiben. Beispielsweise kann verhindert werden, dass ein Dokument aus einem geschäftlichen E-Mail-Konto in eine private Messaging-App exportiert wird. Auch die Nutzung der Zwischenablage zwischen verwalteten und unverwalteten Apps kann unterbunden werden.
Es existieren Szenarien, in denen Organisationen Apps auf iPhone oder iPad bereitstellen möchten, ohne diesen Anwendungen Zugriff auf geschäftliche Daten zu gewähren. Ein typisches Beispiel ist ein Social-Media-Team, das verschiedene Apps benötigt. Diese Apps sollen für die tägliche Arbeit verfügbar sein, jedoch keinen Zugriff auf dienstlichen Daten erhalten. Zur Umsetzung dieses Szenarios muss die MDM-Lösung „Managed Distribution for Users“ unterstützen. In BlackBerry UEM ist diese Funktion implementiert.
Im Folgenden werden die technischen Voraussetzungen und Konfigurationsschritte beschrieben. Damit die Verteilung unverwalteter Apps über den BlackBerry UEM funktioniert, muss der BlackBerry UEM in der Version 12.23 QF2 (On-Premise oder Cloud) installiert sein und an den Apple Business Manager angebunden sein. Im BlackBerry UEM muss auch ein gültiges VPP-Token eingerichtet sein. Über das Apple Volume Purchasing Program werden die zu verteilenden Apps beschafft. In meinem Beispiel verwende ich ein per Apple Device Enrolment am UEM aktiviertes iPhone mit iOS 26.3. Mit einer reinen MDM-Aktivierung würde es auch funktionieren. Da die Apple für die unverwaltete App Installation einen Apple Account erfordert, benötigen wir einen Persönlichen oder Managed Apple Account. Seit September 2025 erlaubt Apple im Apple Business Manager verwaltete Endgeräte auf die Nutzung mit Managed Apple Accounts einzuschränken. Entspricht die E-Mail-Adresse des BlackBerry-UEM-Benutzers dem Managed Apple Account, führt BlackBerry UEM das VPP-Enrolment automatisch durch. Bei einem persönlichen Apple Account oder wenn sich die Benutzernamen unterscheiden, muss das Enrolment manuell abgeschlossen werden. Der Benutzer bekommt hierfür im Enterprise App Store (Work Apps) einen Hinweis. Diese Setup ermöglicht die benutzerbasierte App-Zuweisung und gleichzeitig wird der Zugriff auf die managed Data verhindert. In diesem Beispiel werden die Apps Ice Cubes for Mastodon und Bluesky als unverwaltete Anwendungen bereitgestellt. Beide Apps wurden im Apple Business Manager in ausreichender Lizenzanzahl für den Standort des BlackBerry UEM-Servers beschafft.
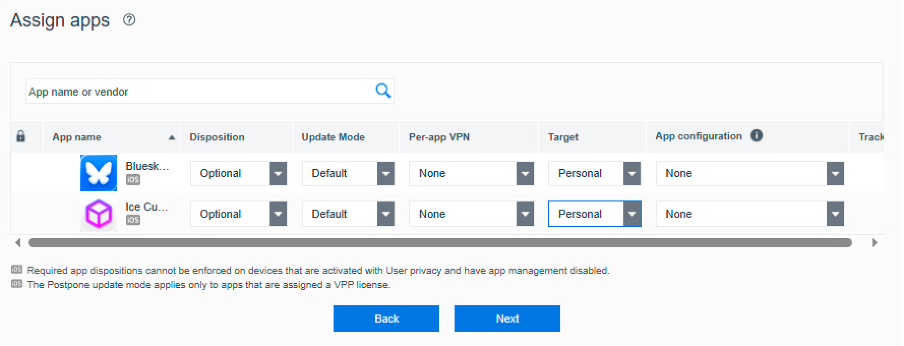
Zur strukturierten Zuweisung wird eine Benutzergruppe mit der Bezeichnung „Social Media Apps“ erstellt, der anschließend beide Anwendungen zugewiesen werden. Für jede App ist die Disposition auf „Optional“ zu setzen und das Target auf „Personal“ zu konfigurieren. Nur mit diesen Einstellungen ist gewährleistet, dass die Anwendungen nach der Installation durch den Benutzer unverwaltet bleiben. Da es sich um unverwaltete Apps handelt, können weder App-Configuration-Profile noch Per-App-VPN-Profile zugewiesen werden.
Screenshot BlackBerry UEM-Konsole – Disposition Optional & Target Personal
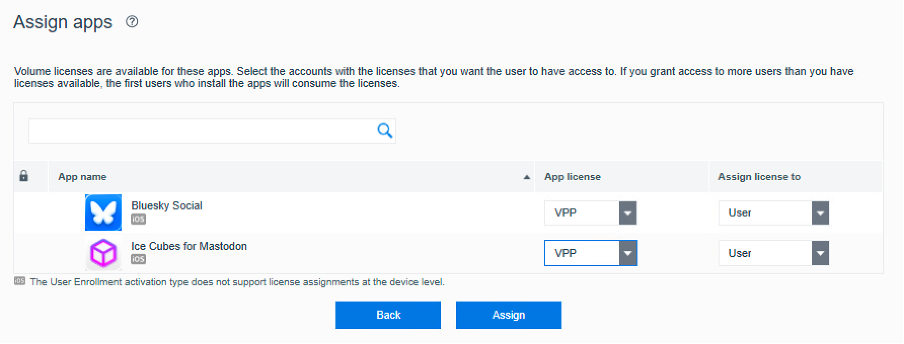
Die Lizenzierung erfolgt jeweils über eine VPP-Benutzerlizenz. Nach Erstellung der Gruppe werden die entsprechenden Benutzer hinzugefügt.
Screenshot BlackBerry UEM-Konsole – Apps mit VPP-Benutzerlizenz
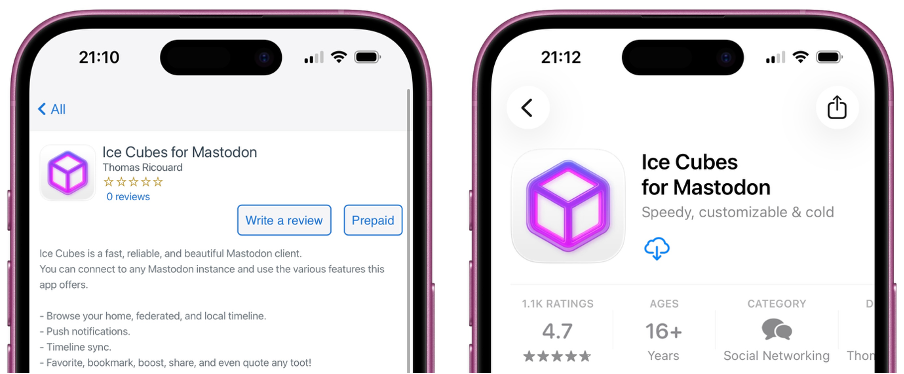
Auf dem iPhone meldet sich der Benutzer im App Store mit seinem Apple Account an. In diesem Szenario wird ein Managed Apple Account verwendet. Managed Apple Accounts können selbst keine Apps beschaffen, weshalb der Einsatz von Managed Distribution for Users der einfachste Weg ist diesen Accounts App-Lizenzen zuzuweisen. Anschließend öffnet der Benutzer auf dem durch BlackBerry UEM verwalteten iPhone den Enterprise App Store mit der Bezeichnung Work Apps. Dort erscheinen die zugewiesenen Anwendungen im Reiter New. Über den Button Prepaid erfolgt die Weiterleitung in den Apple App Store, von dem aus die Installation gestartet werden kann. Sollte der Download-Button noch deaktiviert sein, empfiehlt es sich, den Vorgang nach einigen Minuten zu wiederholen, da die VPP-Infrastruktur von Apple in Einzelfällen etwas Zeit benötigt, um Lizenzen den jeweiligen Apple Accounts zuzuweisen.
Screenshot iPhone – Work Apps und Apple App Store mit Ice Cubes for Mastodon App
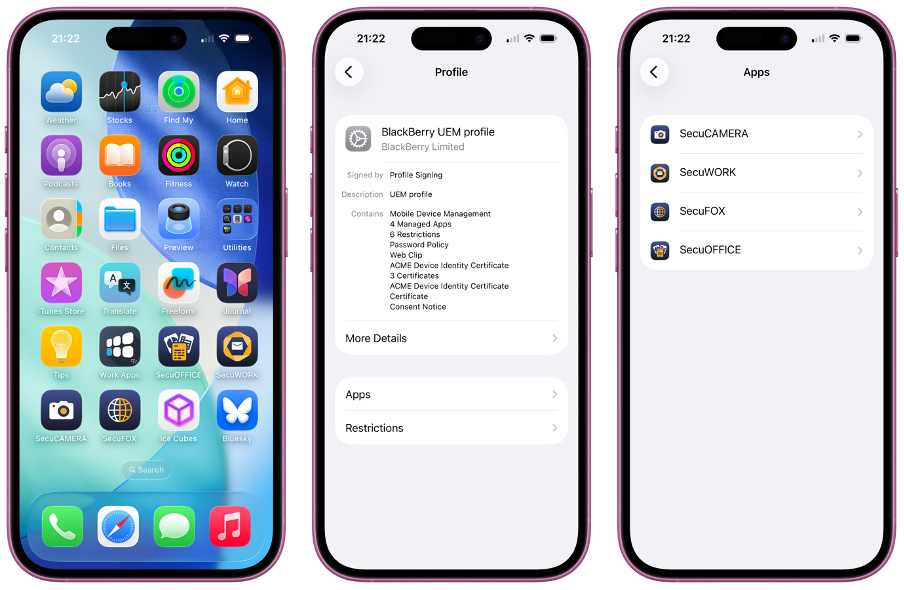
Nach erfolgreicher Installation lässt sich im MDM-Profil unter „Apps“ verifizieren, dass die über Managed Distribution for Users bereitgestellten Apps dort nicht aufgeführt sind. Sie gelten somit als unverwaltet und besitzen keinen Zugriff auf geschäftliche Daten. In diesem Beispiel sind nur die vier Secu-Apps verwaltet.
Screenshot iPhone MDM-Profil – verwaltete und unverwaltete Apps
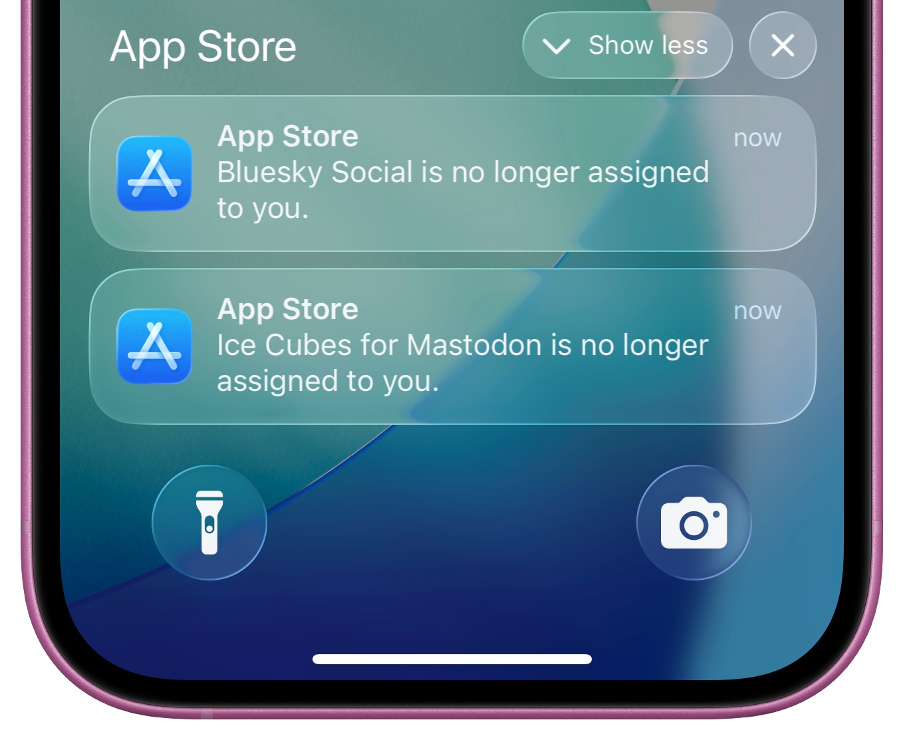
Managed Distribution for Users ermöglicht den Entzug zugewiesener App-Lizenzen. Da die Anwendungen unverwaltet sind, werden sie nach dem Lizenzentzug nicht vom Endgerät entfernt. Nach Entzug der Lizenz kann der Benutzer die App noch bis zu 30 Tage weiterverwenden. Diese Funktion ist insbesondere bei kostenpflichtigen Apps relevant, da Lizenzen dadurch einem anderen Benutzer zugewiesen werden können, ohne erneut eine Lizenz erwerben zu müssen. Über den Lizenzentzug wird der Benutzer im App Store entsprechend informiert.
Screenshot iPhone App Store – Lizenzen für Bluesky und Ice Cubes wurden entzogen
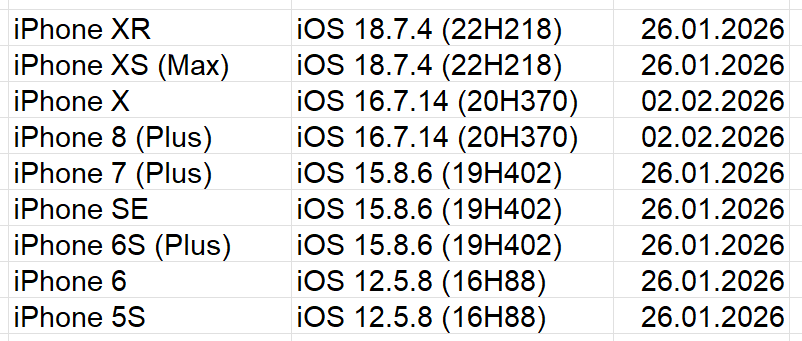
iPhone 11 und neuer laufen mit iOS 26. Aber auch die älteren iPhones bis runter zum iPhone 5S bekommen ein Update mit aktualisierten Zertifikaten. Das gilt auch für iPads mit diesen Software-Versionen.
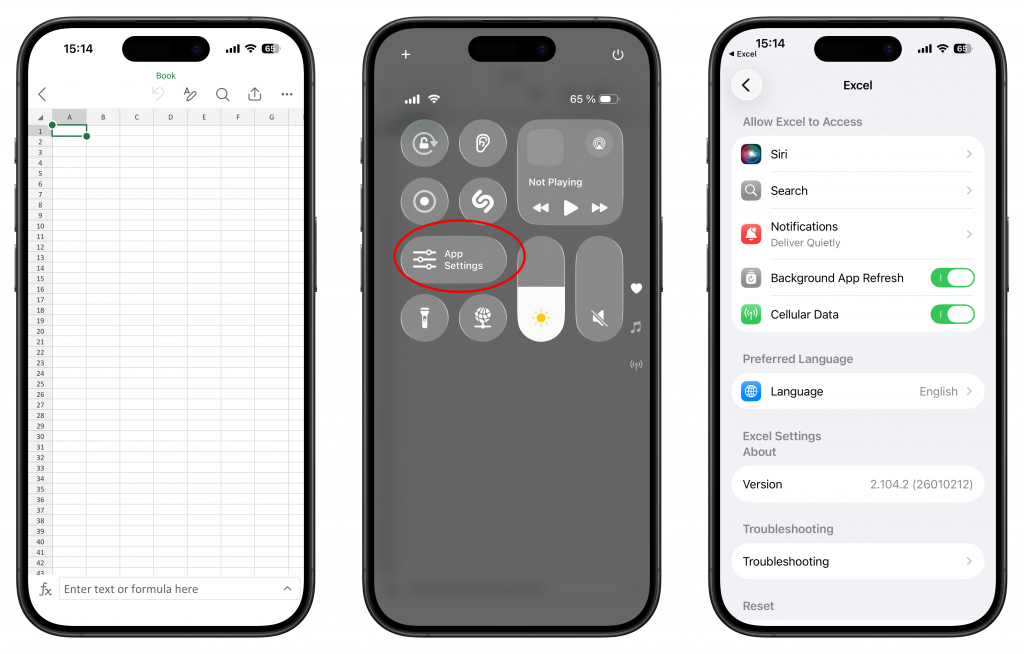
iOS hat alle Einstellungen der Apps an einer Stelle gebündelt. Man findet sie unter den iPhone-Einstellungen unter Apps und dann dem Eintrag für die jeweilige App. Klingt kompliziert, ist es auch.
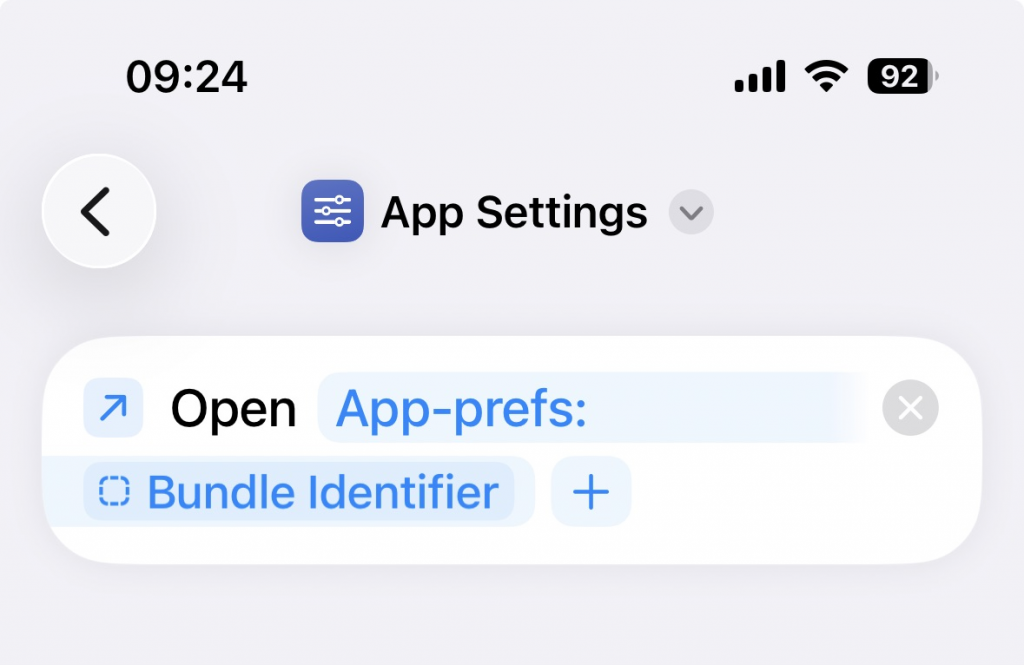
Man kann aber auch direkt dort hinspringen, indem man aus der App einen Shortcut aufruft. Der hat nur einen Befehl. Wie kommt man an den Shortcut? Man nimmt ihn in das Control Center auf. Beispiel Excel:
Control Center öffnen, App Settings wählen, zack ist man bei den Einstellungen des Programms
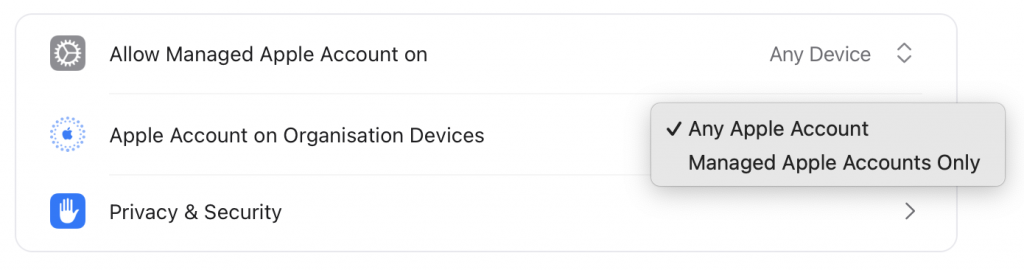
Apple has introduced a new feature in Apple Business Manager (ABM) that allows administrators to control which Apple Accounts can sign in on managed devices. Apple calls this feature Apple Account on Organisation Devices. This setting is in your ABM tenant under Access Management-> Apple Services. Administrators can choose to allow either any Apple Account or restrict sign-in only to Managed Apple Accounts. This capability enables organizations to block users from utilizing Personal Apple Accounts on company-issued devices. Previously it was only possible to restrict on which device type Managed Apple Accounts can sign-in.
Apple hat heute iOS 18.4 veröffentlicht. Mit iOS 18.4 ist es nun ohne Umwege möglich Apple Intelligence in Deutschland zu nutzen. Nach einem Update auf iOS 18.4 wird der Nutzer aufgefordert Apple Intelligence einzurichten. Im Unternehmens- und Behördenumfeld wollt ihr Apple Intelligence gegebenenfalls deaktivieren. Dafür müssen die iPhones und iPads per MDM verwaltet sein. Dann könnt ihr den Geräten sogenannte SkipKeys mitgeben. Mit dem SkipKey Intelligence lässt sich die Aufforderung Apple Intelligence einzurichten ausblenden. Diese Aufforderung erscheint direkt nach dem iOS 18.4 installiert wurde und das iPhone oder iPad gebootet hat.
Im BlackBerry UEM müsst ihr dafür ein Custom Payload Profil erstellen. Dort fügt ihr den unten gezeigten XML-Text ein und weist es den Endgeräten bzw. Nutzern zu. Nach dem Update auf iOS 18.4 wird der Nutzer nicht mehr aufgefordert Apple Intelligence einzurichten.
In der IT Policy, auch bekannt als MDM Restrictions, solltet ihr noch folgende Einstellungen deaktivieren damit der Nutzer diese Apple Intelligence Funktionen nicht nutzen kann:
Allow Genmoji
Allow image playground
Allow image wand
Allow mail summary
Allow personalized handwriting results
Allow writing tools
Allow external intelligence integrations
Allow external intelligence integrations sign-in
Allowed external intelligence workspace IDs
Allow Mail smart replies
Allow Notes transcription
Allow Notes transcription summary
Allow Safari summary
Allow Visual Intelligence summary
Allow Apple Intelligence Report
Damit diese Richtlinien und der SkipKey greifen, müssen die iPhones und iPads supervised sein. Eine reine MDM-Aktivierung reicht nicht aus. Die genannten Einstellungen lassen sich auch in anderen MDM-Lösungen vornehmen. Eine direkte Übernahme des oben gezeigten XML-Beispiels wird in der Regel nicht möglich sein. Bei anderen MDM-Lösungen benötigt ihr eine vollständige .mobileconfig-Datei. Für Details müsst ihr in die Dokumentation eures MDM-Herstellers schauen.
Nutzen eure Anwender BlackBerry Dynamics, dann solltet ihr in der BlackBerry Dynamics Policy noch die Einstellung Allow Apple Intelligence in-app writing tools deaktivieren. Mehr muss man nicht tun um Apple Intelligence auf den verwalteten iPhones und iPads zu deaktivieren.
Und wie immer gilt mein Rat: testet eure Apps und Konfigurationen mit iOS 18.4 bevor ihre das Update für eure Nutzer erlaubt.
When troubleshooting issues on iPhones or iPads, it can be helpful to collect sysdiagnose logs. To get the device to collect these types of logs, you must simultaneously press both volume buttons and the side or top button, depending on the iPhone or iPad model you have. When the device vibrates for a brief moment, the log collection was triggered successfully. It can be very trick to get the button pressing right. There is a much easier way to trigger sysdiagnose log collection. You can use AssistiveTouch to simplify the process.
Go to Settings-> Accessibility-> Touch-> AssistiveTouch.
Turn on the switch for AssistiveTouch. Your device will now display a bright button on your screen (not shown in the screenshots).
Under Custom Actions tap on Single-Tap.
Select Analytics from the menu list
Tap on the AssistiveTouch button shown on the device screen to trigger the log collection.
Your device will display a message (second device screen) that it is gathering analytics. The log collection will take about ten minutes to complete. When the log collection is completed, another message will be displayed (third device screen). You can then collect the logs from Settings-> Privacy & Security-> Analytics & Improvements-> Analytics Data. The log files you want always start with the name sysdiagnose_. As the log files are usually a few hundred Megabytes in size, I recommend sending them via AirDrop to your Mac for further analysis. Thank you, Markus B. for reminding me of this feature.
For extended logging, Apple provides debug profiles. Usually, Apple support or the software vendor will tell you when it is necessary to install these debug profiles.
When new iOS updates are released, it can happen that even small updates take exceptionally long to download. In my experience the easiest fix to speed up the download is to delete the partially downloaded update and start the software update again. To delete the update in progress, navigate to Settings-> General-> iPhone Storage. Scroll down to the list of apps. There you should have an entry for the iOS update, e.g., iOS 18.1.1. Open that entry and tap on Delete Update as shown in the screenshot. Go back to Settings-> General-> Software Update to start the download again. This time the download should happen much faster. The same fix will work on your iPad, too.
Ich freue mich immer, wenn Hersteller kontinuierlich Softwareupdates für ihre Produkte veröffentlichen. Damit werden die Geräte ein Stück sicherer und hoffentlich länger genutzt. Ein Hersteller, der hier einen guten Track Record hat, ist Apple. Hier gibt es teilweise noch für alte Geräte Software- und Sicherheitsupdates. Was aber bei diesen Updates gerne übersehen wird, ist die Tatsache, dass nur die aller neuesten Apple Betriebssystemversionen alle Sicherheitsupdates enthalten. Ein Gerät, das heute mit iOS 17.7 betrieben wird, dem aktuellen Update für den 17.x Branch, enthält gegebenenfalls Schwachstellen, die mit dem neuesten iOS 18.x Update, zurzeit iOS 18.0.1, geschlossen sind. Diese Regel gilt auch für macOS. Apple beschreibt das auf ihrer Webseite in einem kurzen Hinweis:
Hinweis: Aufgrund von Abhängigkeiten der Architektur und Systemänderungen in jeder aktuellen Version der Apple Betriebssysteme (beispielsweise von macOS 14. iOS 17 usw.) werden nicht alle bekannten Sicherheitsprobleme in früheren Versionen behoben, etwa von macOS 13, iOS 16 usw.
Daher mein Rat: Im Zweifel sollte man, wenn es keine anderen Abhängigkeiten gibt, sein iPhone besser auf iOS 18 aktualisieren als es auf iOS 17 zu belassen.
P.S.: Wenn ich iOS schreibe, meine ich damit auch immer iPadOS.
Unter iOS 17 war es möglich, ein Profil von einer Webseite über den Safari-Browser herunterzuladen und dann direkt in den iOS-Einstellungen zu installieren. Das ist unter iOS 18 nicht mehr möglich. Unter iOS 18 wird das Profil nur heruntergeladen. Safari unter iOS 18 fügt das Profil nicht in die Installationsliste hinzu. Beim Versuch ein heruntergeladenes Profil aus der Download-Liste zu installieren, wird nur der Klartext des Profils angezeigt.
Installationsversuch auf einem iPhone mit iOS 18
Um das Profil zu installieren, muss in den Downloads-Ordner in der Dateien-App gewechselt werden. Von dort aus kann man das Profil öffnen und bekommt den Hinweis die Profilinstallation in den Einstellungen abzuschließen.
Profil-Installation aus der Dateien-App
Diese Änderung betrifft nur die Installation von Profilen über den Safari-Browser. Empfängt man das gleiche Profil per AirDrop, z.B. von einem anderen iPhone oder Mac, dann wird das Profil direkt der Liste der zu installierenden Profile in den Einstellungen hinzugefügt. Dort kann man die Installation des Profils abschließen, so wie es schon unter iOS 17 möglich war. Es bleiben, wie bisher, acht Minuten zum Abschluss der Profilinstallation. Das beschriebene Verhalten gilt auch für die Installation von Zertifikaten, da deren Installation auf iOS wie eine Profilinstallation behandelt wird. Soweit ich das recherchieren konnte, ist das neue Verhalten unter iOS 18 von Apple gewollt. Das ist nicht die enizige Änderung im Kontext von Profilen unter iOS 18. Mit iOS 18 ist z.B. auch die profilbasierte Benutzerregistrierung (Profile-based User Enrollment) weggefallen.
Danke an Steffen, der mich auf das Problem hingewiesen hatte.
Das Thema Apple indigo ist sicherlich einigen bekannt. Ich hatte vor einiger Zeit hier darübergeschrieben. Da es für die notwendigen Konfigurationseinstellungen nur wenig öffentliche Dokumentation gibt, möchte hier beginnen diese Dokumentation zu erstellen. Da einer der wesentlichen Komponenten einer Apple Indigo-Lösung das VPN ist, beginne ich mit der Dokumentation zur Erstellung des VPN-Profils. Ich zeige, wie ihr am BlackBerry UEM ein passendes VPN-Profil erstellen könnt. Dieses VPN-Profil kann dann dazu genutzt werden, um auf Ressourcen und Dienste im internen Netz zuzugreifen. Dieses VPN-Profil ist für die Nutzung mit BlackBerry UEM in einem Brightsite-Setup gedacht. Auf das VPN-Profil für eine Darksite-MDM-Installation gehe ich nicht ein, weil praktisch keine Organisation bei Apple indigo auf ein Darksite-MDM setzen möchte. Darksite-MDM für Apple indigo bringt einfach zu viele Nachteile und praktisch keine Vorteile.
In der UEM-Konsole unter Richtlinien und Profile-> Netzwerke und Verbindungen->VPN wird über das Plus-Symbol ein neues VPN-Profil angelegt
Im Feld Name muss der Name für das VPN-Profil vergeben werden, z.B. indigo_VPN_Profil
Bei den Gerätetypen ist nur die Auswahlbox für iOS auszuwählen
In der Auswahlliste Verbindungstyp muss IKEv2 ausgewählt werden
Unter Remote-Adresse muss der FQDN des VPN-Gateways eingetragen werden, z.B. vpngw.boui.de
Für Lokale ID wir der VPN-Benutzername benötigt. Da das Profil für mehrere Nutzer verwendet werden soll, tragen wir hier eine Variable ein. Das kann z.B: %username% sein.
Für die Remote-ID wird wieder FQDN des VPN-Gateways eingetragen. Je nach VPN-Lösung muss hier gegebenenfalls ein anderer Wert eingetragen werden
In der Auswahlliste Authentifizierungstyp muss Benutzeranmeldeinformationen ausgewählt werden.
In der Auswahlliste Verknüpftes Profil für Benutzeranmeldeinformationenmuss das zuvor angelegte Profil für Benutzeranmeldeinformationen ausgewählt werden. In unserem Beispiel heißt das Profil indigo_VPN_Zertifikat. Hinweis: Im Kontext von indigo darf das VPN-Zertifikat nicht über den MDM-Kanal auf das Endgerät gepusht werden. Das VPN-Zertifikat kann z.B. über ein sicheres, internes Netz (Wifi oder Ethernet) über den Safari-Browser auf das Gerät installiert werden.
Den Wert für Keep-alive-Intervall muss auf 10 Minuten gesetzt werden.
Die Haken für MOBIKE deaktivieren und IKVEv2-Umleitung deaktivieren bleiben abgewählt
Der Haken für Perfekte Geheimhaltung bei der Weiterleitung aktivieren muss gesetzt werden
Die Option NAT-Keep-alive aktivieren wird eingeschaltet und der Wert 110 gesetzt
Die Haken für Interne IPv4- und IPv6-IKEv2-Subnetze verwenden, Zertifikatwiderrufprüfung aktivieren und Fallback aktivieren bleiben entfernt
Der Haken für Untergeordnete Sicherheitszuordnungsparameter anwenden wird gesetzt und die Werte wie folgt konfiguriert
DH-Gruppe: 19
Verschlüsselungsalgorithmus: AES-128-GCM
Integritätsalgorithmus: SHA2 256
Schlüsseländerungsintervall: 1440
Der Haken für IKE-Sicherheitszuordnungsparameter anwenden wird gesetzt und die Werte wie folgt konfiguriert
DH-Gruppe: 19
Verschlüsselungsalgorithmus: AES-128
Integritätsalgorithmus: SHA2 256
Schlüsseländerungsintervall: 1440
Der Wert für MTU kann bei 1280 bleiben
Da wir das Profil für Per App VPN und Per Account VPN nutzen wollen, muss der Haken für Enable per-app VPN gesetzt werden.
Da Safari bei indigo nicht über den VPN-Tunnel auf interne Ressourcen zugreifen darf, dürfen keine Safari Domains eingetragen würden. Das gleiche gilt für die anderen Domain-Listen.
Der Haken für Allow apps to connect automatically muss gesetzt werden.
In der Auswahlliste Traffic Tunneling muss der Wert Application layer ausgewählt werden
Über den Button Hinzufügen wird das neue VPN-Profil gespeichert.
Das fertige VPN-Profil sollte dann wie folgt aussehen
In a few weeks’ time Apple will launch new iPhones and a new OS version: iOS 18. We should also see an iPadOS 18 update. As usual, many users will immediately jump onto the new iOS version as soon as it is available to the public. If you are an organisation that issues iPhones and iPads to their end users through Apple Business Manager and an MDM solution, I would recommend to not immediately do the upgrade to the new iOS version. Through your MDM solution Apple allows you to delay the update on supervised devices for up to 90 days. This gives you ample time to test all your business applications and confirm that they work properly with iOS 18 and iPadOS 18. When the tests are finished successfully, your users can safely do the upgrade to iOS 18 and iPadOS 18. And you can rest assured that you will not be flooded with support requests related to the upgrade.
My recommendation is to delay the updates for 30 days and then go through your test plan. Should you encounter issues during the testing that need to be addressed by Apple, your MDM supplier or any 3rd party app developer, you can easily extend the 30 days as required and work on having the issues resolved.
With BlackBerry UEM delaying the software updates is easy and simple. All you need to do is modify the IT policy assigned to your users or their devices and enable “Delay software updates (supervised)” and set a value for “Software update delay period (supervised only)”. The screenshot below shows an “IT Policy” with the delay enabled for 30 days. Other MDM solutions usually give you similar options to configure the software update delay. Good luck with your testing!
Most of my customers who are issuing smartphones and tablets to their employees, usually give their users iPhones and iPads. As I have outlined in my previous post, a big challenge is to keep these devices up to date. I often get asked which requirements need to be met for the OS software updates to be done automatically or manually by the user. Until recently, there was not much public information from Apple on this topic for iOS and iPadOS devices. This support article was recently updated by Apple and now includes helpful details on the criteria that need to be met for the iOS updates to work, e.g. network requirements and power requirements. For a user-initiated update, the device needs to have a battery percentage of at least 20%. Rapid Security Response updates can be installed while the battery percentage is at 5% and the device is connected to power. If you are managing iPhones and iPads, I recommend you to read the support article. Previously most of the information was only available on Apple’s AppleSeed portal and covered under NDA.
During last year’s WWDC Apple provided MDM vendors a new way to enforce software updates on iOS devices which are supervised. This is a big improvement over the previous options as users are no longer able to skip or circumvent these updates. The new feature allows administrators to set a deadline by which the update must be installed. The user always has the option to install the update prior to the date set through the MDM solution. This week’s release of iOS 17.6 gave me an opportunity to test this feature with our BlackBerry UEM. I was curious to see which notifications a user would get on their device as the WWDC23 video only shows the notifications for macOS. The first screen shows that the MDM has enforced an iOS update and by when the update will be installed. The second and third screen show the respective notifications 12 hours and one week before the update is due.