Previously I explained how you could use an iPhone to add another iPhone or iPad to Apple Business Manager. There is another common task where you no longer need a Mac or PC: restoring iOS on an iPhone in recovery mode.
The process is very simple and only requires an iPhone or iPad running iOS 18.
You will see a screen titled support.apple.com/iphone/restore showing a computer and USB cable.
While in this state, click the side button as fast as possible until the Apple logo appears and starts flashing. Release the button.
You will see an animation of two iPhones moving closer to each other. Your iPhone is now in the wireless restore mode.
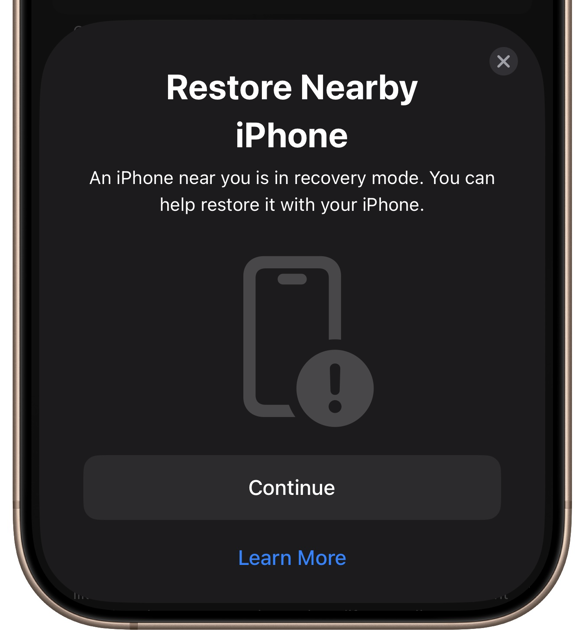
On your other iPhone you will see a pop-up Restore Nearby iPhone
Click Continue.
Enter the six digit pairing code shown on the other iPhone. The pairing process will take a few moments to complete. The process will fail if your iPhone or iPad are connected to a Wi-fi network with a captive portal or where 802.1x authentication is required.
Select System Recovery and tap Continue.
Depending on your Internet bandwidth, the process can take time to complete. Be patient and make sure to connect both devices to a charger while the process is running.
So far, I have used this feature to restore an iPhone 16 and an iPad Pro 11″ M4. Apple states that this will work with an iPad mini with an A17 Pro CPU, too. I do not know if this works with older devices, e.g., iPhone 15. I am happy to test if someone sends me the older devices. Regardless, this feature can be particularly useful if you need to restore an iPhone and do not have access to a Mac or PC to complete the restore. Think of scenarios where you have users in a remote location, e.g., branch offices, with limited access to a Mac or PC. If you have successfully tested this process with older devices, I would appreciate your feedback in the comments.
Apple hat heute iOS 18.4 veröffentlicht. Mit iOS 18.4 ist es nun ohne Umwege möglich Apple Intelligence in Deutschland zu nutzen. Nach einem Update auf iOS 18.4 wird der Nutzer aufgefordert Apple Intelligence einzurichten. Im Unternehmens- und Behördenumfeld wollt ihr Apple Intelligence gegebenenfalls deaktivieren. Dafür müssen die iPhones und iPads per MDM verwaltet sein. Dann könnt ihr den Geräten sogenannte SkipKeys mitgeben. Mit dem SkipKey Intelligence lässt sich die Aufforderung Apple Intelligence einzurichten ausblenden. Diese Aufforderung erscheint direkt nach dem iOS 18.4 installiert wurde und das iPhone oder iPad gebootet hat.
Im BlackBerry UEM müsst ihr dafür ein Custom Payload Profil erstellen. Dort fügt ihr den unten gezeigten XML-Text ein und weist es den Endgeräten bzw. Nutzern zu. Nach dem Update auf iOS 18.4 wird der Nutzer nicht mehr aufgefordert Apple Intelligence einzurichten.
In der IT Policy, auch bekannt als MDM Restrictions, solltet ihr noch folgende Einstellungen deaktivieren damit der Nutzer diese Apple Intelligence Funktionen nicht nutzen kann:
Allow Genmoji
Allow image playground
Allow image wand
Allow mail summary
Allow personalized handwriting results
Allow writing tools
Allow external intelligence integrations
Allow external intelligence integrations sign-in
Allowed external intelligence workspace IDs
Allow Mail smart replies
Allow Notes transcription
Allow Notes transcription summary
Allow Safari summary
Allow Visual Intelligence summary
Allow Apple Intelligence Report
Damit diese Richtlinien und der SkipKey greifen, müssen die iPhones und iPads supervised sein. Eine reine MDM-Aktivierung reicht nicht aus. Die genannten Einstellungen lassen sich auch in anderen MDM-Lösungen vornehmen. Eine direkte Übernahme des oben gezeigten XML-Beispiels wird in der Regel nicht möglich sein. Bei anderen MDM-Lösungen benötigt ihr eine vollständige .mobileconfig-Datei. Für Details müsst ihr in die Dokumentation eures MDM-Herstellers schauen.
Nutzen eure Anwender BlackBerry Dynamics, dann solltet ihr in der BlackBerry Dynamics Policy noch die Einstellung Allow Apple Intelligence in-app writing tools deaktivieren. Mehr muss man nicht tun um Apple Intelligence auf den verwalteten iPhones und iPads zu deaktivieren.
Und wie immer gilt mein Rat: testet eure Apps und Konfigurationen mit iOS 18.4 bevor ihre das Update für eure Nutzer erlaubt.
This week, Apple has launched the iPhone 16e. There are many commentators with a negative view on the iPhone 16e. Many of them called the iPhone 16e an inferior product and wrong product decision by Apple. I very much disagree with this view. I would like to explain why I disagree.
Who is going to buy the product? A person or an organization which wants to cheapest available iPhone. This will be a customer who does not care for the latest features or fancy colors. They have made the decision based on long term use and a proper support channel. This is especially true for large organizations which are frequently called enterprises. It is especially true for government organizations. These customers buy “fleet devices” by the thousands.
In this type of organisation, users will be issued their iPhone with a screen protector pre-installed, a case, and a USB charger. In some cases Bluetooth might be restricted. If they need a replacement for their accessories, they will call IT or get it from the vending machine. Therefore, there is not much upsell potential for Apple or any third-party accessories manufacturer. Even if these devices came with MagSafe and an UWB chip, it is unlikely that Apple or any other manufacturer would be able to sell any additional accessories to these user groups. So, no upsell on an AirTag or a MagSafe charger.
Enterprises need a device that can last them three to five years. This is a perfect fit for the iPhone 16e. Sure, there are organizations who are deploying iPhone 15 Pro or 16 Pro to their users. These are often VIP users, and the exception.
For the average office worker the iPhone 16e is perfect. The increased battery life is also important for these organisations, as some of them deploy their MDM solution in a darksite scenario where you need to use an Always On VPN or VPN On Demand. These VPN configuration can be very taxing on the battery life. Any increase in battery life is appreciated by these user groups.
Why not a cheaper Android? There are use cases in organisations where Android is the only choice. But often, at least in my experience, iPhones and iPads are much better to manage than most Android devices. The majority of my customers issues iPhones to their users. This is often driven by the fact that the TCO for any iPhone is much better than of most Android devices and the iPhones have a higher acceptance with the users. Even when given the choice between a comparably priced Android smartphone and an iPhone, e.g., iPhone 15 Pro and Samsung Galaxy S24, users tend to select the iPhone.
I am sure there are many enterprises and similar organizations out there which have delayed their smartphone device refresh because they were waiting for “the new iPhone SE”. That is why I think the e in iPhone 16e is for enterprise. If I would have the budget for a new test device, I would have pre-ordered an iPhone 16e.
Apple allows you to fully automate the MDM enrollment process for most of their devices using Automated Device Enrollment (ADE). In combination with the MDM, ADE allows you to customise and automate the device activation process without the need for an administrator to ever touch the device. To use ADE with your MDM of choice, the devices have to be purchased through an authorized reseller. The reseller can then add the devices to your Apple Business Manager (ABM) instance. There you can then assign them to your MDM servers. For devices that you already own or which were not purchased through a reseller that can add the devices to your ABM instance, there is a manual way to add them. The manual approach requires the use of Apple Configurator – either on an iPhone or Mac. The following steps describe how you can add an iPhone to ABM using another iPhone. It works exaclty the same when you want to add an iPad. I find these steps much easier than using a Mac to add a device to Apple Business Manager.
What you need to prepare and have ready before you begin
The factory reset iPhone or iPad you want to add to ABM
Before you begin, make sure to install Apple Configurator on your iPhone and login with your ABM account. After the login you should be presented with the below view. Notice the view finder in the center of the screen. We will use this view finder later on to scan the enrollment code.
Preparing Apple Configurator
Tap on the cogwheel in the lower left corner
Make sure the “Share Wi-Fi” is selected
Make sure that “None” is selected under “MDM SERVER ASSIGNMENT”
We will assign the device to the correct MDM server instance later
Tap on “Done” in the top left corner
Adding the iPhone to Apple Business Manager
Now get the iPhone or iPad you want to add.
Turn on the iPhone and swipe up on the “Hello” Screen
You will be presented with the language selection screen
Continue the OOBE (out of the box experience) setup until you get to the Quick Start screen. There you will have to tap on Set Up Without Another Device
Continue with the OOBE setup until you get to the Choose a Wi-Fi Network screen
Now get the iPhone where you have previously installed Apple Configurator. When iPhone is in proximity, the screen on the device you want to add, should change to the below view.
Make sure to position the image in the frame of the Apple Configurator to initiate the enrollment process into Apple Business Manager
The enrollment process will beginn immediately
Leave the iPhone with Apple Configurator open, unlocked and next to the device you are adding. If you close Apple Configurator to soon, the enrollment process will fail and you will have to repeate the whole procedure.
When the enrollment process is finished, you will get the below screen showing that the iPhone was added to your ABM instance. Please tap on Erase iPhone to complete the enrollment to your ABM instance
You can now login to your ABM and assign the device to your MDM server instance.
A few months ago, a customer reached out to me and reported that their users running iOS 18 on their iPhones and iPads were seeing an issue where they would not get push notifications for new mails. Unlike with iOS 17, the Mail app would not have fetched emails in the background. Users would have to open the Mail app to update their inbox.
All customer devices affected were running iOS 18 and enrolled to BlackBerry UEM. As the Exchange server is behind the firewall, we used Per-Account VPN to reach the users mailboxes. The VPN tunnel was configured to only allow access to the Exchange server as this was all we need for the mail profile to send and receive messages.
In our test environment we were unable to reproduce the issue. Activating the same device against the customer’s environment immediately showed the issue. As there were multiple variables, MDM, VPN setup, customer’s network, Exchange server configuration, the troubleshooting continued for a few weeks. The actual root cause could not be identified.
About two weeks ago, I was told that Apple’s Private Relay feature might causing the problem. Initially I ruled this out as a cause because none of the customer devices had Private Relay enabled. Apple documents which servers need to be reached for Private Relay to work: mask.icloud.com & mask-h2.icloud.com. I was told that mail delivery for IMAP mailboxes on iOS 18 can be delayed if these two host names cannot be resolved or reached.
Could it be that the Mail app is trying to reach these two hosts while Private Relay is disabled?
Could this be the cause for Exchange ActiveSync Push Notifications not working in my customer’s setup?
To test this theory, I prepared my test environment. To rule out any issues with the MDM setup, I worked with a manually added Exchange mailbox. For the VPN, I opted for a different solution than my customer. I used a device-wide VPN instead of a Per-Account VPN. This allowed me to simplify my testing a bit. I made sure that these two Private Relay hosts are reachable on my network. I sent multiple emails, and all were instantly delivered, and I got notifications for these emails.
I then repeated my testing with the two Private Relay hosts blocked. I would not get any push notifications for new e-mails. When opening the Mail app, it took very long for the messages to be downloaded to the device. It looked like the Mail app had to run into a timeout before it would fetch the emails from the Exchange server.
A second and third round of testing confirmed the results. With the two hosts mask.icloud.com & mask-h2.icloud.com blocked, no push notifications would appear on the device. For all my tests I kept Apple’s Private Relay feature disabled in the iOS settings. I did all my testing on a device with iOS 18.2.1. I did not test if this issue is fixed with iOS 18.3, which was released today.
Today I shared this finding with my customer. After they updated their VPN configuration and made sure that the Per-Account-VPN tunnel can reach the two Apple Private Relay hosts, the issue disappeared and the Mail app worked as expected. Push Notifications were delivered instantly and messages would be downloaded in the background. Finally, we can close this issue.
I know that Per-Account-VPN for Exchange mailboxes is not that common, especially with many organizations already on Exchange Online. Keep in mind that this issue was not caused by the Per-Account-VPN configuration, it only appeared in that specific setup. The VPN tunnel had only a limited set of hosts it was allowed to reach. There is a high chance that you will notice the same issue if mask.icloud.com and mask-h2.icloud.com are not reachable on your network, regardless of if VPN is used or not. It is not an issue occurring only with Microsoft Exchange mailboxes. This issue can also appear when accessing an IMAP mailbox while the device is on a network where the two hosts are blocked.
[Addendum, vowe] If you use Pihole, make sure you whitelist the two mask domains.
This week I have learned a new trick with Keynote on macOS. Using the Live Video feature you can mirror the screen of an iPad or iPhone into your presentation slides.
To use the screen mirroring in Keynote, open an existing presentation or create a new one. From the menu bar select Insert-> Live Video. By default your Facetime camera will be added to the slide deck. To change view to your iPhone or iPad screen, make sure that your device is connected to your Mac using a USB C or Lightning cable. The cable that shipped with your device is sufficient for this to work. On the right side of the Keynote window, click on the plus sign next to Live Video Sources. Give the source a name, e.g., iPhone. Select the connected iPhone or iPad from the drop down list. Click on Add. Your iPhone or iPad screen should now be mirrored to your slide deck as shown below. To make the mirrored device look like the real device, you can overlay the screen mirror with the actual device frame. During your next presentation you can now show the live screen of your iPhone or iPad without the need to leave your presentation. I think this approach can be much more convenient than switching to QuickTime or a third-party app to show your device screen during a presentation.
Bonus tip: You can also use this to mirror your Apple Watch screen. On your iPhone navigate to Settings-> Accessibility-> Apple Watch Mirroring and turn on the mirroring feature.
When troubleshooting issues on iPhones or iPads, it can be helpful to collect sysdiagnose logs. To get the device to collect these types of logs, you must simultaneously press both volume buttons and the side or top button, depending on the iPhone or iPad model you have. When the device vibrates for a brief moment, the log collection was triggered successfully. It can be very trick to get the button pressing right. There is a much easier way to trigger sysdiagnose log collection. You can use AssistiveTouch to simplify the process.
Go to Settings-> Accessibility-> Touch-> AssistiveTouch.
Turn on the switch for AssistiveTouch. Your device will now display a bright button on your screen (not shown in the screenshots).
Under Custom Actions tap on Single-Tap.
Select Analytics from the menu list
Tap on the AssistiveTouch button shown on the device screen to trigger the log collection.
Your device will display a message (second device screen) that it is gathering analytics. The log collection will take about ten minutes to complete. When the log collection is completed, another message will be displayed (third device screen). You can then collect the logs from Settings-> Privacy & Security-> Analytics & Improvements-> Analytics Data. The log files you want always start with the name sysdiagnose_. As the log files are usually a few hundred Megabytes in size, I recommend sending them via AirDrop to your Mac for further analysis. Thank you, Markus B. for reminding me of this feature.
For extended logging, Apple provides debug profiles. Usually, Apple support or the software vendor will tell you when it is necessary to install these debug profiles.
When new iOS updates are released, it can happen that even small updates take exceptionally long to download. In my experience the easiest fix to speed up the download is to delete the partially downloaded update and start the software update again. To delete the update in progress, navigate to Settings-> General-> iPhone Storage. Scroll down to the list of apps. There you should have an entry for the iOS update, e.g., iOS 18.1.1. Open that entry and tap on Delete Update as shown in the screenshot. Go back to Settings-> General-> Software Update to start the download again. This time the download should happen much faster. The same fix will work on your iPad, too.
Apple devices have this neat feature to share Wi-fi passwords with other Apple devices, e.g., iPhone, iPad and Mac. With iOS 18 Apple introduced an easier way to share Wi-Fi credentials even outside the Apple ecosystem, e.g., with Android smartphones. Within the Passwords app you can display a QR code that can be used by any other device to join a Wi-Fi network. Open the Passwords app on your iPhone, navigate to the Wi-Fi section. The Wi-Fi network you are currently connected to is shown at the top of the list. All other Wi-Fi networks your device has saved, are shown in alphabetical order. Search for the Wi-Fi network you want to share and open that entry. Tap on Show Network QR Code. Scan the QR code with the camera app of the Android smartphone and the device will join the Wi-Fi network. The QR code can be used by Apple devices, too.
Passwords app on an iPhone showing the QR code for a Wi-Fi network
Note: Wi-Fi networks that do not require a password or have other means of authentication, e.g., WPA2 Enterprise, will not have the Show Network QR code option in the Passwords app.
Eine mögliche Ursache: Es ist noch gar nicht fertig. Ehrliche Reviewer sagen das auch ganz klar. “… developed from the ground up for Apple Intelligence” (Tim Cook) ist bisher noch ein leeres Versprechen, das erst nächstes Jahr erfüllt wird. Aktuell ist das alles noch beta, unvollständig und muss beantragt werden. Dazu kommt, dass Apple sich noch nicht mit dem DMA der EU arrangiert hat und hofft, genügend Druck aufbauen zu können.
In der Keynote fehlte Deutsch als zu realisierende Sprache für 2025 noch und Apple ist mittlerweile teilweise zurückgerudert. Es sei nie anders geplant gewesen, als Deutsch nächstes Jahr zu unterstützen. Bei weiter anhaltender Kaufzurückhaltung könnte da noch ziemlich viel Bewegung in die Sache kommen. Große Händler wie Amazon oder Telekom ordern frühzeitig größere Mengen und die müssen sich auch absetzen.
Ich finde das iPhone 16 übrigens ein sehr gelungenes Update. Dass iPhone 16 und 16 Pro so nahe zusammengerückt sind, ist eine gute Entwicklung für den Kunden.
Direkte Zuweisung des Gerätes an einen Benutzer in der BlackBerry UEM-Konsole unter Users-> Apple DEP devices
Aktivierung über ein vorher gesetztes Aktivierungskennwort
Aktivierung über die Active Directory Anmeldedaten
Technisch wären auch eine Aktivierung über einen Identity Provider und über den Apple Configurator möglich. Auf diese beiden Optionen gehe im Folgenden nicht ein. Für alle drei Optionen müssen die Geräte im Apple Business Manager (ABM) existieren. Sobald sie dort gelistet sind, kann man sie der jeweiligen BlackBerry UEM Instanz zuweisen. Nach der Synchronisation des BlackBerry UEM mit dem ABM, erscheinen die Geräte in der UEM-Konsole unter Users-> Apple DEP devices. Die Synchronistation der Geräteliste mit dem ABM erfolgt alle 24 Stunden. Die Synchronisation lässt sich auch manuell anstoßen. Aus der Geräteliste heraus kann das Gerät direkt einem Benutzer zugewiesen. Die Aktivierung erfolgt ohne Eingabe weiterer Anmeldedaten. Diese Aktivierungsart ist z.B. für Kiosk-Mode-Szenarien sinnvoll. Damit wäre die erste Option aus der obigen Liste abgedeckt.
Für die Option 2, der Aktivierung per E-Mail-Adresse und Aktivierungskennwort, muss im Feld Benutzername die E-Mail-Adresse des Benutzers eingetragen werden. Das Aktivierungskennwort hat der Benutzer per E-Mail erhalten bzw. wurde durch den UEM-Administrator in der UEM-Konsole gesetzt und dem Benutzer mitgeteilt. Das Aktivierungskennwort kann der Benutzer auch selbstständig im Self Service Portal des BlackBerry UEM setzen. Im folgenden Beispiel hat der Benutzer die E-Mail-Adresse aboui@lab.boui.de. Nach Eingabe des Aktivierungskennworts im Feld Passwort, kann die Aktivierung am UEM über den ABM erfolgen.
iPhone-Aktivierung mit E-Mail-Adresse und Aktivierungskennwort
Für die Option 3, Aktivierung per Active Directory Anmeldeinformatione, müssen die Daten im Eingabefeld Benutzername im Format FQDN\Username eingetragen werden. In meinem Beispiel laut der FQDN der AD-Domain LAB.BOUI.DE. Der Username lautet aboui. Folglich muss in dem Feld Benutzername folgendes eingetragen werden: lab.boui.de\aboui. Da das Eingeben des Zeichens \ am iPhone nicht einfach ist, kann man alternativ das Zeichen / verwenden. Mit beiden Zeichen funktioniert die Anmeldung. Dass der FQDN in meinem Beispiel identisch mit dem Teil nach dem @-Zeichen aus Option 2 ist, ist reiner Zufall. Das könnte und dürfte in den meisten Umgebungen sehr wahrscheinlich unterschiedlich sein.
iPhone-Aktivierung mit Active Directory Anmeldeinformationen
Falls der FQDN der AD-Domain nicht bekannt ist, kann man sich den FQDN in der Kommandzeile auf einem Windows-Rechner einfach anzeigen lassen. Dafür reicht der Befehl set userdnsdomain.
Ausgabe der Kommandozeile für den Befehl set userdnsdomain
Mit der dritten Option ist es für einen Benutzer oder eine Benutzerin ganz einfach sein iPhone oder iPad zu aktivieren. Viele meiner Kunden nutzen diese dritte Option, weil es den Benutzern ermöglich die Geräte ohne IT-Unterstützung bzw. direkten Zugriff auf das eigene E-Mail-Postfach zu aktivieren. Das ist z.B. bei größeren Geräterollouts oder beim Austausch des iPhones oder iPads sehr hilfreich.
Das Apple Leather Case in Saddle Brown, das ich vor einigen Monaten bearbeitet hat, hält sich großartig. Alle paar Wochen bürste ich es einmal trocken ab, sodass es wieder schön aufgeraut ist. Letztes Jahr hat Apple für das iPhone 15 die Finewoven Cases als Ablösung der Leather Cases eingeführt. Dieses Jahr wurden sie mit der Vorstellung des iPhone 16 ganz eingestellt und nun gibt es von Apple nur noch Plastik.
Solange ich das iPhone 14 Pro schleppe, nehme ich weiterhin dieses Leather Case, das bisher keine Abnutzungserscheinungen zeigt. Und beim nächsten iPhone schauen wir mal.
Es ist mittlerweile fast ein Ritual. Im September gibt es neue iPhones, neue Apple Watches, vielleicht auch HomePods oder AirPods. Die Gerüchteküche rotiert schon Wochen vorher, alle schreiben bei Bloomberg-Korrespondent Mark Gurman ab.
Letztes Jahr bin ich bei meinem erst ein halbes Jahr alten iPhone 14 Pro geblieben und ich habe es nicht bereut. Dieses Jahr wird mich Apple dann abhängen, wenn die neuen AI-Features kommen. Die Prozessorleistung würde dicke reichen, aber der Arbeitsspeicher nicht. Ich konnte aber mit ein paar Tricks auch auf meinem iPad Pro testen, der ausreichend Leistung hat. (18.1 Dev Beta 3, US English als Sprache und ein Account im US-amerikanischen Store reichen aus. Apple Intelligence ist noch nicht fertig, aber es gefällt.
Die neuen iPhone (Pro) 16 bleiben beim mit dem iPhone 12 eingeführten Design. Das Display hat weniger Rand und wird deshalb einen kleinen Tick größer, wie jedes Jahr werden die Kameras besser. Dieses Jahr gibt es ein Camera-Control extra. Bisher nimmt man die Lautstärketasten als Auslöser. Tippen schießt ein Foto, drücken und halten ein Video. Camera Control ist ein zusätzliches Touch Interface zur Bedienung der Kamera. Die 12 MP 5x Zoomkamera gibt es dieses Jahr bei iPhone Pro und Pro Max.
Interessant ist die neue Namensgebung der Prozessoren. Während früher die iPhone Pro neue Prozessornummern bekamen und iPhone die Prozessoren des Vorjahres übernamen, dieses Jahr spricht Apple nun von A18 und A18 Pro.
Die Apple Watch bekommt 10 Jahre nach der Vorstellung des Ur-Modells ein leicht geändertes Design. Auch hier ein etwas größeres Display und ein flacheres Gehäuse. Das war bisher alle drei Jahre der Fall: Mit der Watch 4 kam der abgerundete Bildschirm, mit 7 wuchs er, und nun ist mit Watch 10 turnusmäßig ein neues Design dran. Ein neues Design alle drei Jahre, das passt für mich. Kleiner Trick in der Präsentation: Apple vergleicht Watch 10 mit Watch 6 und nicht der deutlich größeren Watch 7-9. Mir gefällt vor allem das polierte Black. Stahl wird durch Titan ersetzt, wie das bereits das iPhone vorgemacht hat. Ein neues Feature gibt es auch: Erkennung des Schlafapnoe-Syndrom, auch ab Watch 9 und Ultra 2. Ultra 2 bekommt dieses Jahr eine weitere Farbe: mattschwarz. Sonst ändert sich nichts.
Bei den AirPods löst Apple ein Problem. Die zweite Generation hat stets die dritte überschattet, weil sie das gleiche konnte. AirPods 2 und 3 aber werden abgelöst durch gleich zwei neue Modelle der AirPods 4, eins davon mit ANC und den Features der AirPods Pro. AirPods Max bekommt neue Farben und USB-C. So schlau wie die AirPods Pro wird AirPods Max aber nicht, weil auch die neue Version mit dem H1-Chip ausgerüstet bleibt.
AirPods Pro 2nd gen dagegen waren unangefochten das schlaueste Modell. Die bekommen nun auch ein Update mit neuen Funktionen, wohlgemerkt alle bereits verkauften. Das ist gut so. Hearing Protection verhindert Schäden durch zu laute Umgebungen. Das heißt man braucht keine Ohrstöpsel mehr für zu laute Konzerte. Hearing Test prüft das Hörvermögen und Hearing Aid transformiert die AirPods Pro in Hörgeräte. Das ist so überfällig! AirPods Pro sind eine Größenordnung billiger als Hörgeräte. O-Ton der deutschen Pressemitteilung:
Apple Intelligence unterstützt zum Start Englisch (USA) und wird im Dezember auf andere Varianten der englischen Sprache für Australien, Kanada, Neuseeland, Südafrika und Großbritannien ausgedehnt. Unterstützung für weitere Sprachen, darunter Chinesisch, Französisch, Japanisch und Spanisch, folgt im nächsten Jahr.
Apple Intelligence ist für uns erst mal ein Nothingburger. US-Englisch in Dezember, dann ein paar weitere Englisch-Dialekte in Dezember und andere Sprachen nächstes Jahr. Deutsch wurde nicht mal erwähnt. Apple hatte schon mal durchblicken lassen, dass sie unglücklich über den DMA der EU sind. Auf der anderen Seite fehlt ohne Apple Intelligence auch der Druck, ein neues iPhone zu kaufen. Man darf gespannt sein, wie sich das auswächst.
Die Hardware wird ab 20. September geliefert, die .0-Versionen der Software am 16. September.
Mit iOS 18 beendet Apple ein unrühmliches Kapitel. Bisher hatte sich das Unternehmen geweigert, RCS zu unterstützen und damit mehr als SMS/MMS zwischen iPhone und Android zuzulassen. Apple fährt mit iMessage dieselbe Strategie, mit dem auch BlackBerry den eigenen Messenger langfristig an die Wand gefahren hat. Das Ergebnis: Jeder nutzt WhatsApp. Also nicht wirklich jeder. (Guckt in den Spiegel)
Die gute Nachricht des Tages ist deshalb: Ich muss für niemanden WhatsApp installieren. Einfach eine “Textnachricht” schicken.
Das Thema Apple indigo ist sicherlich einigen bekannt. Ich hatte vor einiger Zeit hier darübergeschrieben. Da es für die notwendigen Konfigurationseinstellungen nur wenig öffentliche Dokumentation gibt, möchte hier beginnen diese Dokumentation zu erstellen. Da einer der wesentlichen Komponenten einer Apple Indigo-Lösung das VPN ist, beginne ich mit der Dokumentation zur Erstellung des VPN-Profils. Ich zeige, wie ihr am BlackBerry UEM ein passendes VPN-Profil erstellen könnt. Dieses VPN-Profil kann dann dazu genutzt werden, um auf Ressourcen und Dienste im internen Netz zuzugreifen. Dieses VPN-Profil ist für die Nutzung mit BlackBerry UEM in einem Brightsite-Setup gedacht. Auf das VPN-Profil für eine Darksite-MDM-Installation gehe ich nicht ein, weil praktisch keine Organisation bei Apple indigo auf ein Darksite-MDM setzen möchte. Darksite-MDM für Apple indigo bringt einfach zu viele Nachteile und praktisch keine Vorteile.
In der UEM-Konsole unter Richtlinien und Profile-> Netzwerke und Verbindungen->VPN wird über das Plus-Symbol ein neues VPN-Profil angelegt
Im Feld Name muss der Name für das VPN-Profil vergeben werden, z.B. indigo_VPN_Profil
Bei den Gerätetypen ist nur die Auswahlbox für iOS auszuwählen
In der Auswahlliste Verbindungstyp muss IKEv2 ausgewählt werden
Unter Remote-Adresse muss der FQDN des VPN-Gateways eingetragen werden, z.B. vpngw.boui.de
Für Lokale ID wir der VPN-Benutzername benötigt. Da das Profil für mehrere Nutzer verwendet werden soll, tragen wir hier eine Variable ein. Das kann z.B: %username% sein.
Für die Remote-ID wird wieder FQDN des VPN-Gateways eingetragen. Je nach VPN-Lösung muss hier gegebenenfalls ein anderer Wert eingetragen werden
In der Auswahlliste Authentifizierungstyp muss Benutzeranmeldeinformationen ausgewählt werden.
In der Auswahlliste Verknüpftes Profil für Benutzeranmeldeinformationenmuss das zuvor angelegte Profil für Benutzeranmeldeinformationen ausgewählt werden. In unserem Beispiel heißt das Profil indigo_VPN_Zertifikat. Hinweis: Im Kontext von indigo darf das VPN-Zertifikat nicht über den MDM-Kanal auf das Endgerät gepusht werden. Das VPN-Zertifikat kann z.B. über ein sicheres, internes Netz (Wifi oder Ethernet) über den Safari-Browser auf das Gerät installiert werden.
Den Wert für Keep-alive-Intervall muss auf 10 Minuten gesetzt werden.
Die Haken für MOBIKE deaktivieren und IKVEv2-Umleitung deaktivieren bleiben abgewählt
Der Haken für Perfekte Geheimhaltung bei der Weiterleitung aktivieren muss gesetzt werden
Die Option NAT-Keep-alive aktivieren wird eingeschaltet und der Wert 110 gesetzt
Die Haken für Interne IPv4- und IPv6-IKEv2-Subnetze verwenden, Zertifikatwiderrufprüfung aktivieren und Fallback aktivieren bleiben entfernt
Der Haken für Untergeordnete Sicherheitszuordnungsparameter anwenden wird gesetzt und die Werte wie folgt konfiguriert
DH-Gruppe: 19
Verschlüsselungsalgorithmus: AES-128-GCM
Integritätsalgorithmus: SHA2 256
Schlüsseländerungsintervall: 1440
Der Haken für IKE-Sicherheitszuordnungsparameter anwenden wird gesetzt und die Werte wie folgt konfiguriert
DH-Gruppe: 19
Verschlüsselungsalgorithmus: AES-128
Integritätsalgorithmus: SHA2 256
Schlüsseländerungsintervall: 1440
Der Wert für MTU kann bei 1280 bleiben
Da wir das Profil für Per App VPN und Per Account VPN nutzen wollen, muss der Haken für Enable per-app VPN gesetzt werden.
Da Safari bei indigo nicht über den VPN-Tunnel auf interne Ressourcen zugreifen darf, dürfen keine Safari Domains eingetragen würden. Das gleiche gilt für die anderen Domain-Listen.
Der Haken für Allow apps to connect automatically muss gesetzt werden.
In der Auswahlliste Traffic Tunneling muss der Wert Application layer ausgewählt werden
Über den Button Hinzufügen wird das neue VPN-Profil gespeichert.
Das fertige VPN-Profil sollte dann wie folgt aussehen