Summary: A major brick-and-mortar store sold an Apple Gift Card that Apple seemingly took offence to, and locked out my entire Apple ID, effectively bricking my devices and my iCloud Account, Apple Developer ID, and everything associated with it, and I have no recourse. Can you help? Email paris AT paris.id.au (and read on for the details). ❤️
I am posting this story as a warning and a call to action. Always have a backup plan.
I have three separate identical email accounts and I have two indepent copies of all my cloud data, which also make it three. I used to run two NAS devices with one additional backup, and these have now been in cold storage for more than ten years. I have never gone back to read any data from those.
Apple plans to use a custom 1.2T-parameter Google Gemini model to help power the new Siri next year and will be paying Google ~$1B annually for it (Mark Gurman/Bloomberg) – Techmeme
If this is true, and Mark Gurman has a great track record, it concludes the drama that has been unfolding since last year when Apple announced the iPhone 16 was “built from the ground up” for AI, which Apple does not define as Artificial Intelligence but rather Apple Intelligence.
Google reportedly pays Apple $18B a year for being the default search engine. This deal would mean they are getting $1B back.
There are people who need to install Dev Beta 1, then followed by people who install Pub Beta 1. After lots of iteration and bug fixes, Apple releases the .0 version which goes mainstream. Quickly followed by a .0.1 bug fixes, because after all, those early beta adopters did not really test very well.
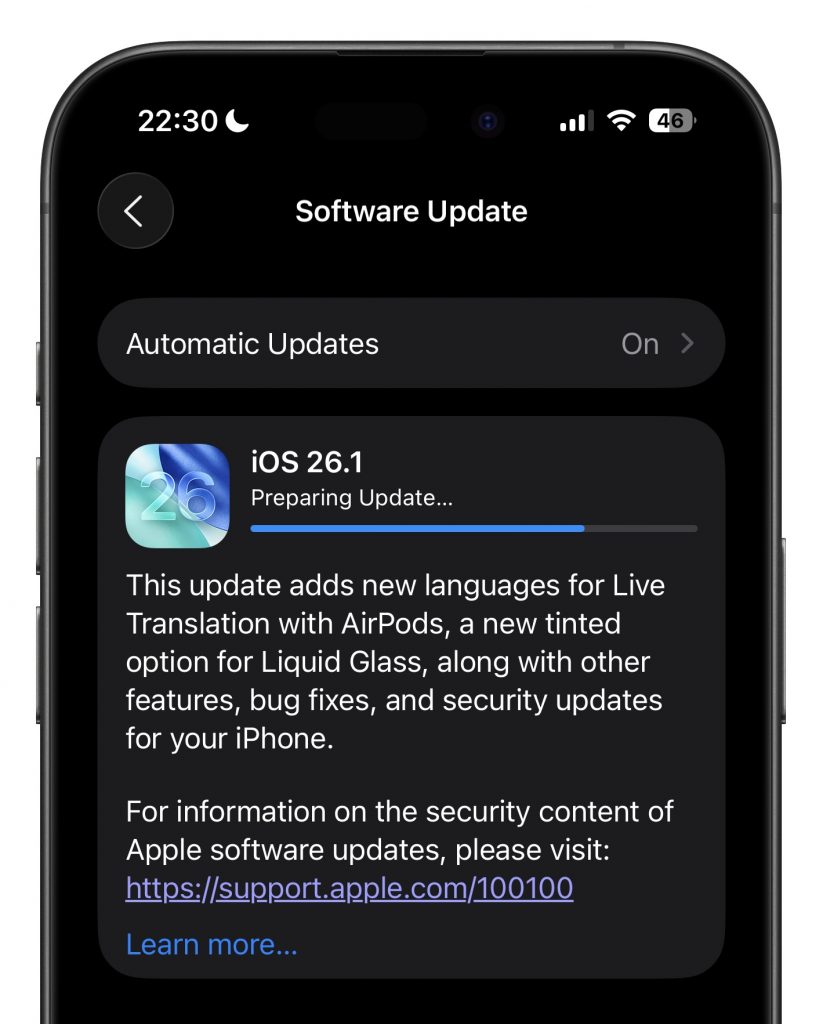
And then comes the big one: the 0.1 release which is the first version I recommend installing. And now it’s here for iOS 26 and the rest.
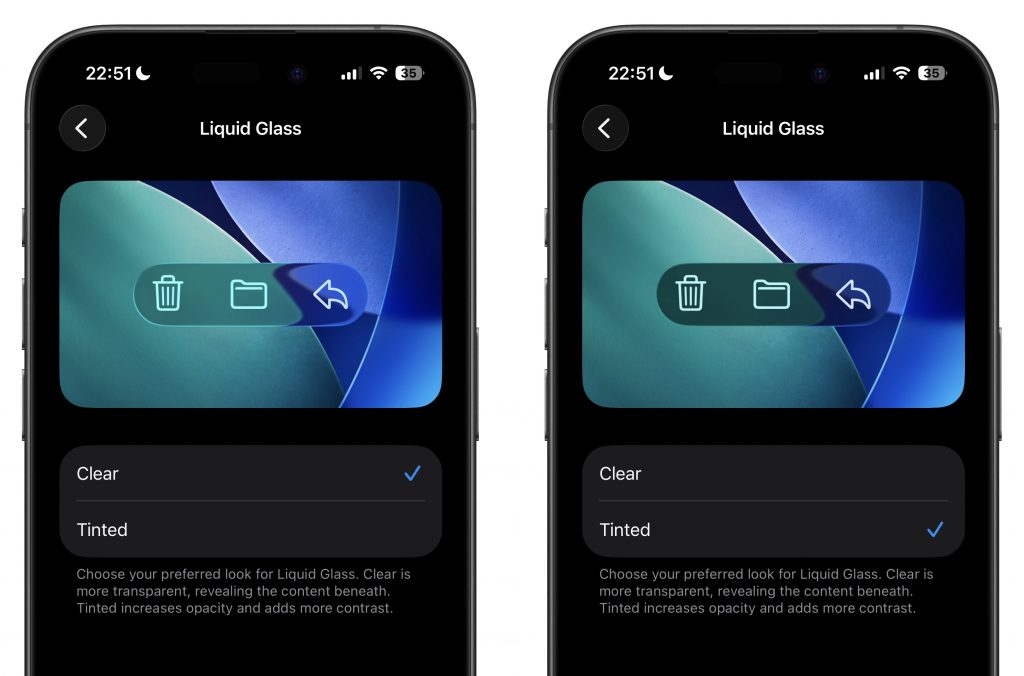
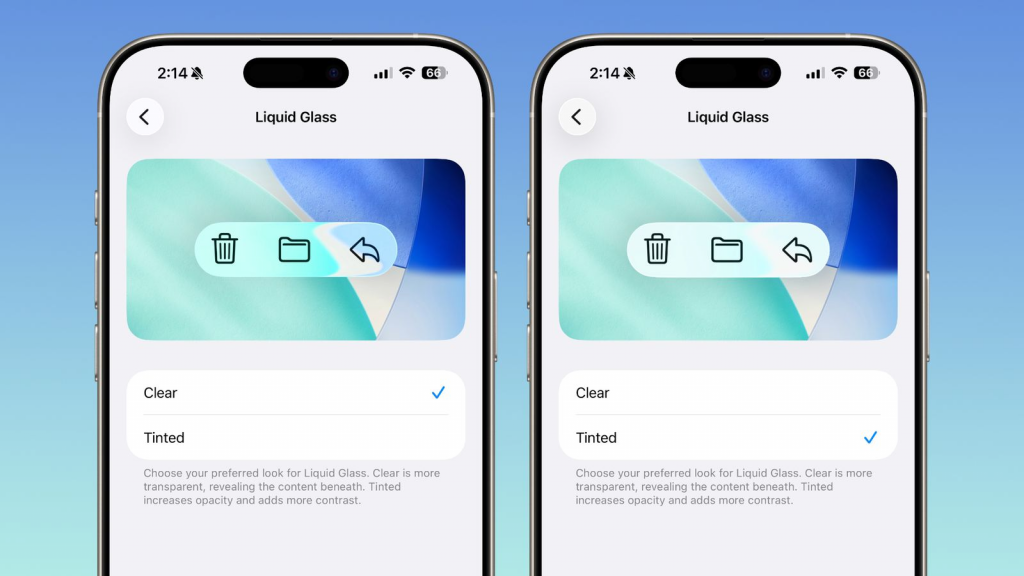
There is one important new display setting which fixes much of the damage done with Liquid Glass. You can now make things less transparent.
I will make one exception for macOS. If you can hold out on an older major release then wait for a few more minor releases and upgrade with .4 or .5.
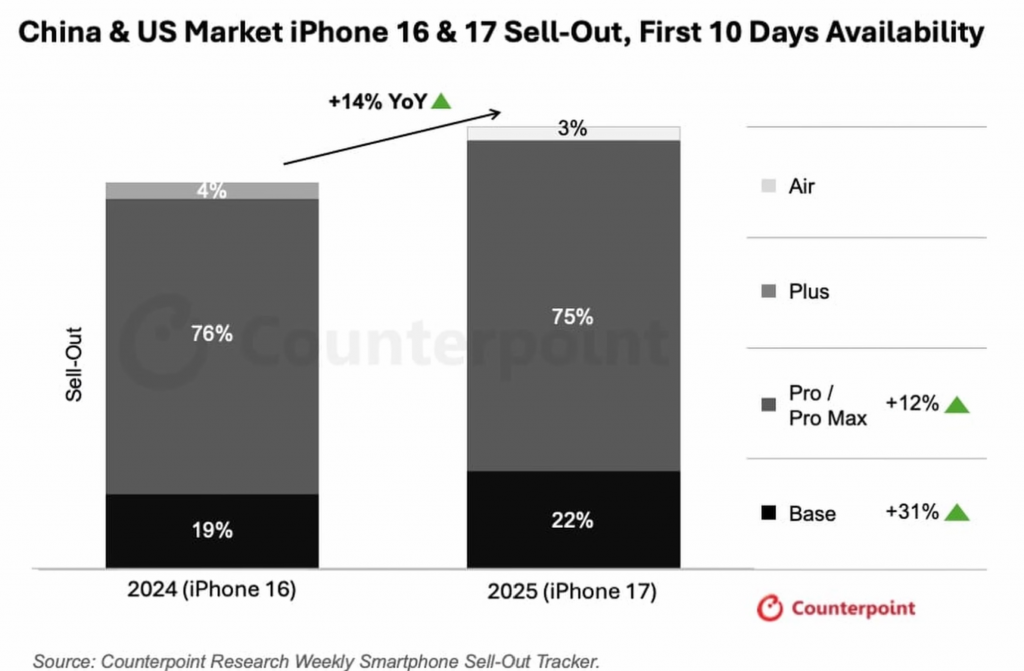
Interessanter Research von Counterpoint. iPhone 17 hat sich in den ersten zehn Tagen deutlich besser verkauft als iPhone 16, was ja auch eher ein lahmes Update war. Das Basis iPhone hat deutlich zugelegt und das iPhone Air verkaufte sich noch (relativ) schlechter als das iPhone Plus.
Das sieht man auch im Preis. Aktuell ist das iPhone Air bereits um 200 Euro billiger zu haben, während das Basis iPhone ausverkauft ist.
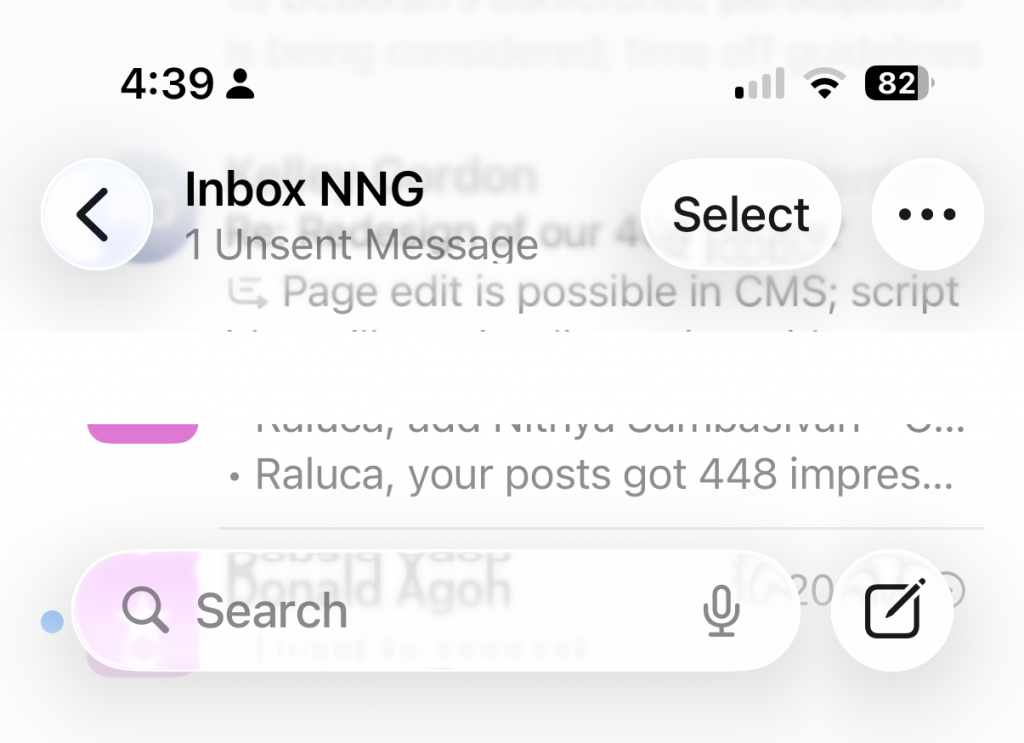
iOS 26 brings Liquid Glass controls laid over noisy backgrounds, jittery animated buttons, shrunken and crowded tab bars, collapsing navigation, and ubiquitous search bars. On top of that, it breaks long‑established iOS conventions, getting closer to Android design.
Overall, Apple is prioritizing spectacle over usability, lending credibility to the theory that Liquid Glass is an attempt to distract customers from iOS 26’s lack of long-promised AI features.
The interface is restless, needy, less predictable, less legible, and constantly pulling focus rather than supporting seamless access to content. Instead of smoothing the path for everyday tasks, iOS 26 makes users relearn basics while enduring a constant parade of visual stunts.
Apple may call it Liquid Glass. To many users, it feels more like a fogged‑up window: pretty from a distance, but frustrating when you try to see beyond it.
Update: Macrumors reports that Apple starts to fix Liquid Glass by giving you the option to remove transparency in 26.1 beta 4. It may take half a year but I expect Apple to undo the damage it did with 26.0.
Aus Samsung-Kreisen höre ich, dass das Galaxy S25 Edge ein Flop ist. Alle mir bekannten Interessenten eines iPhone Air haben dann doch wieder ein Pro Max gekauft. Ich vermute deshalb, dass diese Verdünner nicht als guter Kompromiss wahrgenommen werden. Hat jemand von euch eins?
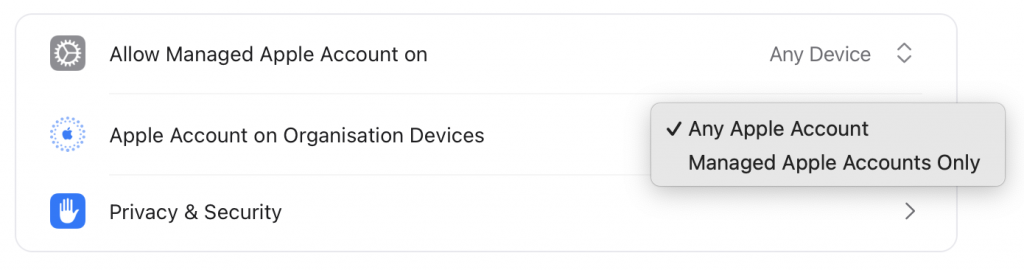
Apple has introduced a new feature in Apple Business Manager (ABM) that allows administrators to control which Apple Accounts can sign in on managed devices. Apple calls this feature Apple Account on Organisation Devices. This setting is in your ABM tenant under Access Management-> Apple Services. Administrators can choose to allow either any Apple Account or restrict sign-in only to Managed Apple Accounts. This capability enables organizations to block users from utilizing Personal Apple Accounts on company-issued devices. Previously it was only possible to restrict on which device type Managed Apple Accounts can sign-in.
macOS ermöglicht es dir, Content Caching Server einzurichten, die Apps, Bücher und Updates im lokalen Netzwerk speichern. Das ist ideal für Umgebungen mit vielen Apple-Geräten, wie Unternehmen oder Schulen, da es den Internet-Datenverkehr erheblich reduziert. Die Updates werden durch die Endgeräte vom Content Caching Server geladen, statt über Apples CDN-Infrastruktur.
Auf deinem iOS-26-Gerät kannst du die Funktion jetzt direkt überprüfen: Gehe zu Einstellungen-> Wi-Fi, tippe auf das (i) neben deinem Wi-Fi-Netzwerk und scrolle zum Abschnitt „Content Caches“. Dort siehst du alle Details und kannst mit einem Test die Download-Geschwindigkeit messen. Bei iPhones oder iPads die nur per Ethernet angebunden sind, werden die Details zum Content Caching nicht angezeigt.
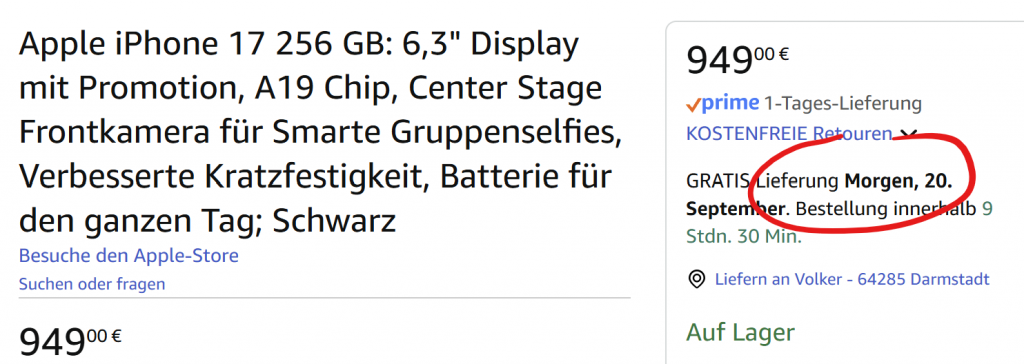
Meine Einschätzung war richtig. Es gab keinen Run auf die neuen iPhones und Amazon kann über Nacht liefern. Das “normale” iPhone 17 wäre meine erste Wahl. Es gibt Varianten mit 256 und 512 GB Speicher.
Die Alternative iPhone 16 ist heute zwar 190 Euro billiger, hat aber nur 128 GB. Ihm fehlen zwei wichtige Neuerungen: das bis zu 120 Hz getaktete Always-On-Display und die wesentlich verbesserte Selfie-Kamera. Zu wenig Speicher schadet der langfristigen Nützlichkeit. Ich gehe davon aus, dass man ein iPhone wenigstens fünf Jahre nutzen wird, bevor man dringend ein neues will.
Das dünne iPhone Air sieht zwar sexy aus, aber es hat Einschränkungen, die sich täglich bemerkbar machen: Kleiner Akku, keine Weitwinkelkamera, nur ein Mono-Speaker. Außerdem kostet es 250 Euro mehr. Ich halte das Air für einen notwendigen Zwischenschritt zu einem schlanken iFold. Apple muss diese Technik erst mal im großen Maßstab erproben.
Update: Mittlerweile haben sich doch zu viele für dieses Modell entschieden und die erste Palette ist weg. Nachschub kommt, wobei Amazon immer konservativ schätzt.
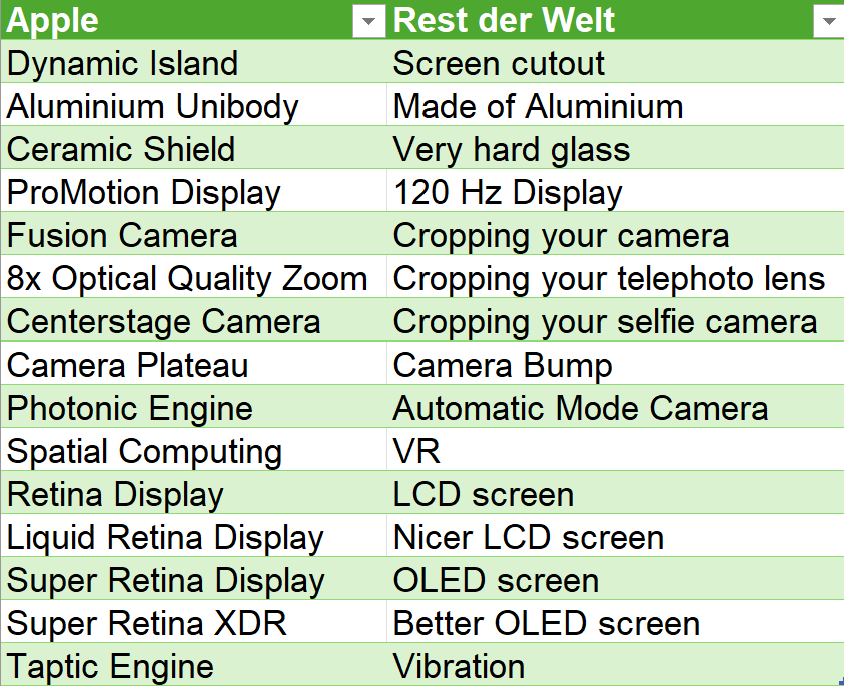
Apple erfindet für alles eigene Vokabeln und setzt jedes Jahr neue Themen. Und die verschwinden dann wieder, ohne großen Eindruck zu hinterlassen. Wer erinnert sich?
iPhone 14 Pro: Dynamic Island
iPhone 15 Pro: Action Button
iPhone 16 Pro: Camera Control
iPhone 17 Pro: Liquid Glass
Die iPhone 16 waren auch “built from the ground up for Apple Intelligence”. Dieses Jahr, kein Piep. Hätte wahrscheinlich auch große Heiterkeit ausgelöst.
Ich will ein bisschen helfen, die richtige Wahl zu treffen bei der Anschaffung eines neuen iPhone. Bei mir steht keine Anschaffung ins Haus, deshalb sind die Überlegungen eher theoretisch.
iPhone 17: Das ist ein gutes Gerät. Es hat (endlich) ein “Promotion”-Display, also einen Bildschirm, der mit unterschiedlichen Frequenzen neu geschrieben werden kann. 120 Hz, wenn Action auf dem Bildschirm ist, und gaaaaanz langsam, wenn es nur eine Uhr anzeigen muss. Das erlaubt ein Always-On-Display. Kann man nutzen, muss es aber nicht. Ebenfalls gut: Es geht bei 256 GB Speicher los. Weniger ist nicht so gut brauchbar.
Das dickste Upgrade ist aber die neue Selfiekamera mit quadratischem Sensor. Damit kannst du ein Gruppenselfie machen, wahlweise auch im Querformat, mit der Kamera oben und die Menschen gucken nicht so schräg zur Seite. Deshalb ein 17 und nicht das alte 16. Auch nicht für hundert Euro weniger.
Preis: 949 €, ganz schön happig, aber wer ein paar Wochen warten kann, der wird bei Amazon sparen können. Ich rechne nicht damit, dass es einen Run auf das Telefon gibt, auch wenn ich das für die beste Wahl halte.
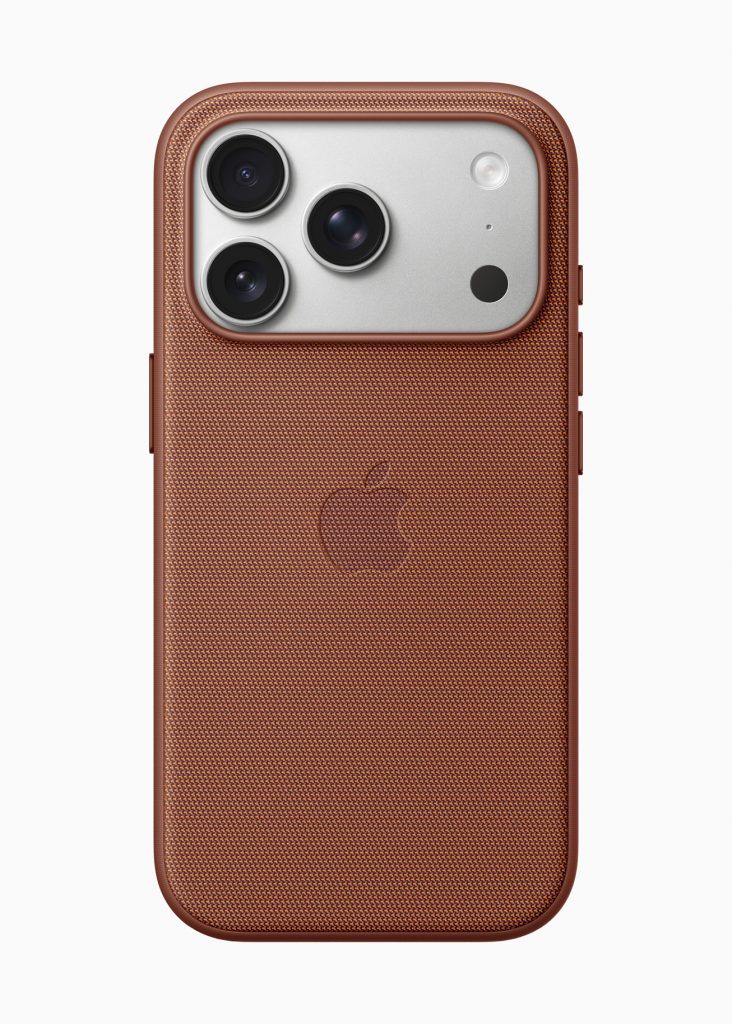
iPhone 17 Pro: Wenn Geld keine Rolle spielt und das iPhone 350 Euro mehr kosten darf, dann ist das 17 Pro eine gute Wahl. (Vielleicht nicht in orange.) Ob du das Max-Modell haben willst, das weißt du selbst. Ich mag den Alu-Unibody, weil er robuster ist als eine reine Glasrückseite. Er wird Kratzer kriegen, aber die Rückseite ist einfach besser geschützt. Alle drei Kameras auf der Rückseite haben nun 48 Megapixel. Mit den “Vergrößerungen” 0,5 x, 1x und 4x. Wie kommt Apple auf 8 Objektive? Sie verkaufen Bildausschnitte als Brennweiten.
iPhone 17 Air: Wenn du das am Freitag bestellen willst, dann würde ich zur Vorsicht raten. Du solltest erst mal Hardcore Reviews abwarten, keine Hands-On oder Jubelinfluencer. Ja, das Ding ist dünn, aber nach dünn hat eigentlich keiner gefragt. Jeder wünscht sich eine bessere Batterielaufzeit und Apple macht den Akku kleiner. Nicht umsonst bietet Apple einen drahtlosen Zusatzakku an, der aus dem schlanken Air ein dickes Air++ macht.
Ich halte das Air für einen Probelauf für ein faltbares iPhone. Exakt so wie Samsung erst ein ganz dünnes Galaxy brachte und danach ein neues Galaxy Fold, das zusammengeklappt wie ein normales Galaxy wirkt. Ein “iPhone Fold” wird dann zwei Akkus haben und garantiert anders heißen.
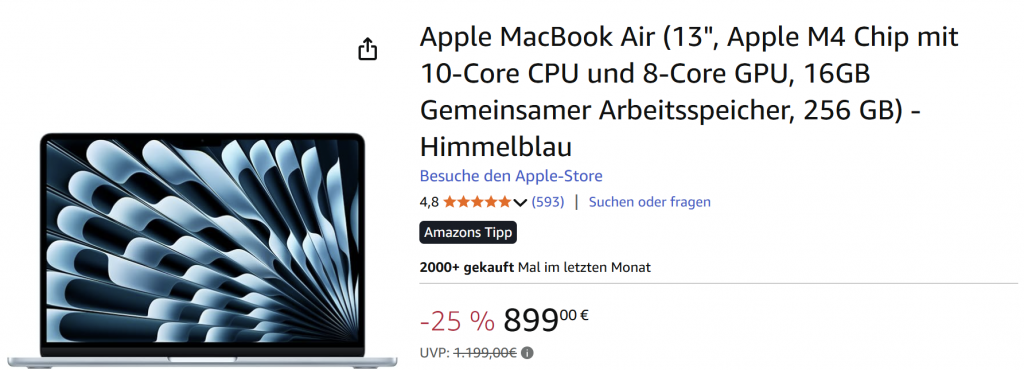
Heute wurde ich gefragt, ob ein MacBook Air ein guter Kauf ist. Aber hallo! Und am besten das günstigste Modell, das man kriegen kann. Upgrades sind bei Apple teuer und auf deren Website immer alles zum Listenpreis. Und wenn der Speicher wirklich mal für ein Filmprojekt zu eng wird, dann gibt es ein Terabyte in einer sauschnellen externen SSD. Mit den iPhones ab dem 15 Pro kann man auch direkt darauf filmen.
Apple has new iPhones. That was to be expected. The regular one, the normal Pro and the larger Pro. For years, Apple has tried to sell a fourth version. First, for two seasons a smaller one called iPhone 12 mini and 13 mini. Then, for three seasons, a Plus version of iPhone 14, 15 and 16. All of them did not sell well. This time they are trying a thin one, with just one camera, a smaller battery, but razor-thin. Success is not a given. Do people want a thinner iPhone with less power? Time will tell.
All new iPhones are “the best iPhones we ever built”. Of course they are. The Pro models get a new camera hump that moves the flash and the Lidar to the other side. That is a new’ish look, but I can’t say it is prettier than before. What I like is the Aluminium back side with just a small glass – sorry Ceramic Shield – inlay where the charging coil is. The antennas are now in this new camera hump.
Apple does not like to talk about memory but the Pro phones are rumored to go from 6 to 12 GB RAM. On device AI demands more memory which makes anything before the 15 Pro unable to perform, including my own 14 Pro.
The thin iPhone Air is only available without SIM tray, which maximizes internal space for the battery that takes up almost the whole body below the camera hump. I suspect this model also has no space for the speaker at the bottom.
The software gets a new UI which is taxing the processors more. I am still not convinced that Liquid Glass is desirable but I am confident that it will improve much like the development betas have.
In other news, Apple has new AirPods Pro 3. They add heart rate sensing during workouts, live translation with AI running on iPhone, and they should provide even better audio and noise cancellation.
Apple Watch gets refreshed in all three models: Watch SE 3, Watch 11 and Watch Ultra 3. New features include hypertension alert and a sleep score. Both are soft markers. It cannot tell you the actual blood pressure but looks for indications of hypertension. Watch 11 gets more battery life, raising from 18 to 24 hours. Cellular models now support 5G, up from LTE.